


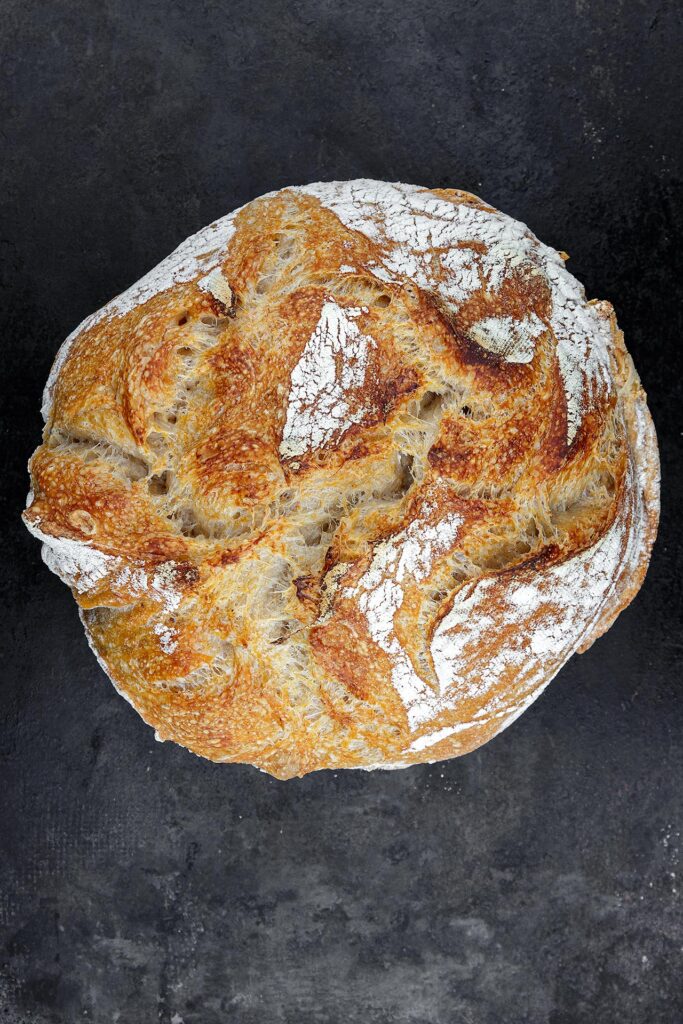
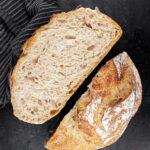
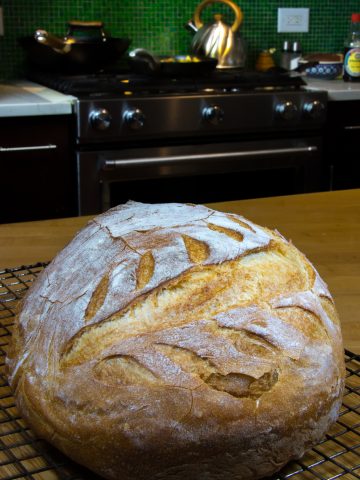
Our deliciously rustic no knead bread recipe delivers a jaw-dropping artisan bread with a thick crispy crust, a soft yet chewy crumb and big holes just like sourdough. No Dutch oven? No problem! Read on for lots of ideas on what to use instead.
Our favorite Dutch oven alternative is a casserole dish with lid. The easiest alternative is to bake the bread on a pre-heated tray and place a pan of boiling hot water on the lower rack.

What is no-knead bread?
Introduced in the early 2000s by New York Baker Jim Lahey, no-knead bread stands out because it eliminates the need for traditional kneading. Lahey's recipe requires creating a wet and sticky dough that goes through an extended fermentation period, allowing gluten to develop naturally. This prolonged rise period not only results in delicious bread but also contributes to the formation of a delightfully crispy crust.
Many variations of the original recipe exist. The biggest complaint about no knead bread is its lack of flavor. In our recipe we add a whole wheat-based poolish to intensify the flavor.
Why this no-knead recipe works
If you love baking artisan bread, this spectacularly easy, flavorful artisan bread recipe is for you. Perfect for both beginners and experts alike, our recipe creates a bread that is astonishingly close to sourdough without the fuss.
- Resting eliminated the need for heavy kneading or a stand mixer. Allowing the dough to rest for at least 12 hours facilitates autolysis, breaking down protein strands and eliminating the necessity for kneading.
- 80% hydration creates a very wet dough which is ideal for no-knead dough.
- Only 1% active dry yeast is needed in this recipe as we have a long, slow fermentation to develop gluten and deepen flavor.
- Folding creates the soft, yet chewy crumb. Folding further strengthens the gluten network, creating a more elastic dough. This enhanced elasticity enables the dough to more effectively trap gases released by the yeast during fermentation, resulting in the formation of large, airy holes in the bread.
- Poolish intensifies the flavor. The biggest criticism of no-knead bread is its lack of flavor. We've overcome this challenge by incorporating poolish, which adds more developed nutty flavor during a 12-18-hour fermentation and makes the dough easier to handle.
- Humidity creates the perfect crust. By efficiently transferring heat to the bread's surface, a humid oven creates the perfect crust. Moreover, the increased moisture helps form the tiny bubbles and bumps that create a delectable crunch and texture in the crust.
- An enclosed environment helps bake the perfect load. The bread is baked in a very hot pre-heated Dutch oven or pot which not only increases the radiant energy on the bread but also intensifies the humidity of the baking area. This results in a crispy, crackly loaf with a crust that crackles and snaps as it cools.

What if you don't have a Dutch oven?
Its ok! You can still make this bread if you pick a substitute that provides the same function. In fact, I use a Le Creuset 3 Quart Round Casserole Dish not a Dutch oven for this recipe.
How to pick an alternative to a Dutch Oven
In the traditional no-knead Dutch oven recipe, the covered Dutch oven is preheated, creating a baking environment with increased radiant energy and humidity, resulting in a crispy, crackly loaf.
To pick a substitute, you need to create a very hot and humid environment.
- At its most basic, you can create the hot surface by heating an oven proof pot or surface like a baking sheet in the oven.
- The enclosed humid environment can be created by placing a disposable roasting pan on top of the bread. If you don't have a cover, place a pan of boiling hot water or ice cubes, on the lower rack. The evaporating hot water will create a humid environment in the oven. You can also spray the interior of the oven with water for added humidity. One drawback of the method of baking this bread while creating steam in the entire oven is that the it does not seem to rise as much. However this method will still produce a very tasty bread.
Below are some examples of different alternatives to Dutch ovens that you can use:
- A heavy oven safe pot with a tight lid. If you do not have a lid, cover, and seal the pot with foil then place a baking try, cookie sheet or aluminum foil to make sure the foil does not open and release steam. I use a 3-quart covered casserole dish.
- A cast iron skillet or heavy bottom skillet and an oven-safe pot large enough to invert and place on top. You can also place a large, disposable turkey roasting pan on top or make a tent with foil. Note that when baked, the bread will be about 4-5 inches high.
- A cake pan, casserole dish or other oven-proof dish. Cover with a large oven-proof pot, roasting pan or a tent made with foil.
- A pizza stone or large inverted baking sheet. Cover with a large oven-proof pot, roasting pan or a tent made with foil.
- If you cannot find a suitable cover create a humid environment in the oven. Bake the bread on a heated baking tray and place a loaf pan filled with hot boiling water or ice cubes in the rack below. The evaporating water will create a humid environment. If you have a water spray, spray the inside of the preheated oven before closing the oven door. Remember to remove the water pan during the last 15 minutes of baking as dry heat is needed for the bread crust to brown and crisp.

Ingredients for this no-knead bread recipe without Dutch oven
This no-knead bread recipe uses simple ingredients which are very easily available from local grocery stores.
Poolish
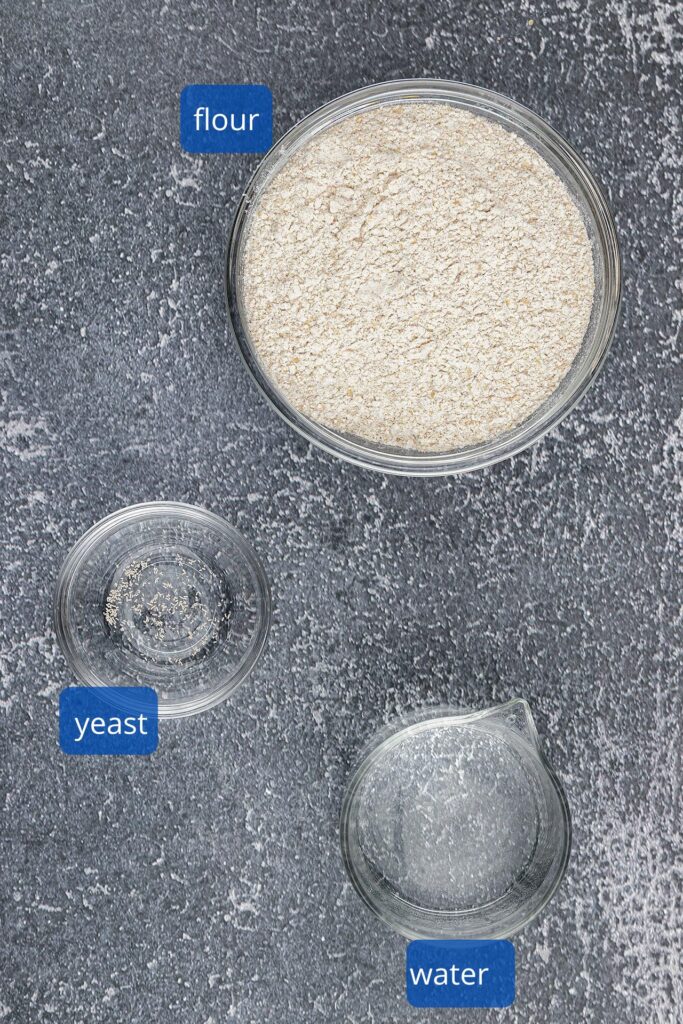
- Whole wheat flour. We use whole wheat flour in our poolish because it has more intense and complex flavor. Additionally, the extra nutrition in whole wheat flour can boost the yeast fermentation process since there is more food to consume. A great substitute is rye flour. While bread flour and all-purpose flour can also be used but there may be some loss in flavor.
- Active dry yeast for slow fermentation..
- Room Temperature Water.
No-Knead Bread Ingredients

- Bread flour. With its high protein content of 12-14%, bread flour has a clear advantage over all-purpose flour because it produces a stronger, more elastic dough which in turn creates a taller, fluffier loaf of bread. Substituting some or all the bread flour with a different type of flour or combination of flour will result in a slightly denser but still very delicious bread.
- Poolish.
- Active dry yeast for slow fermentation.
- Room temperature water. The water temperature is important because it affects how fast the yeast activates. Cold water will slow down yeast activity resulting in the recipe requiring more time. Hot water will kill the yeast.
- Salt. I use table salt because the smaller granules mix more easily into the dough.
How to Make This No Knead Bread Recipe Without Dutch Oven
Day #1: Make the poolish

- In a small bowl or plastic container, combine water and a little bit of yeast. Mix well. Add whole wheat flour to the mixture and stir until fully combined. Cover the bowl with a tight-fitting lid or plastic wrap and set it aside in a warm place, overnight.
Day #2: Make and let the dough rise

- Uncover the poolish and add water and yeast to the dough. Mix thoroughly with the stick end of a wooden spoon. Transfer the mixture to a large mixing bowl. Add the flour over the poolish, then add the salt on top. Mix the dry ingredients until no visible flour remains. Cover and let the shaggy dough rest for 30 minutes (first rise).
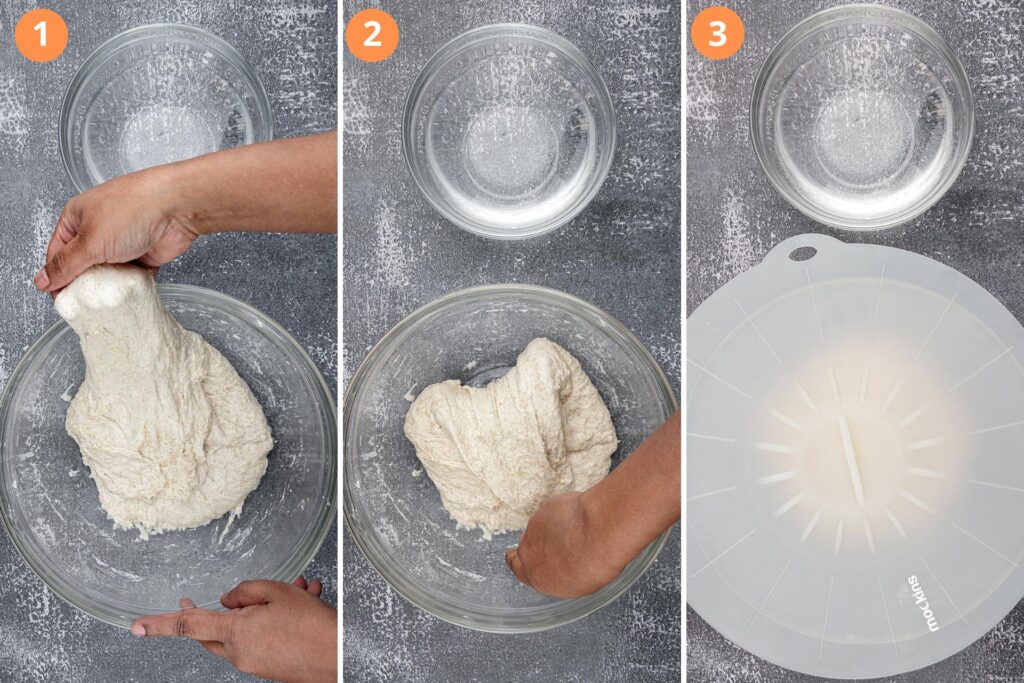
- Uncover, and using wet hands, lift the dough from the bottom of one side and fold it over the top. Rotate the bowl a quarter turn and repeat the folding process. Continue rotating and folding three more times until all four sides of the dough have been folded. Cover and let the dough rest for 45 minutes (second rise). Repeat the folding process every 45 minutes, for a total of four times. By the end, the dough will feel silky and smooth. Cover and allow the bowl of dough to rest at room temperature for an overnight rise.
Day #3: Bake the Bread

- Sprinkle flour on the edges of the puffy dough and carefully pour it onto a well-floured work surface. Gently fold the dough from all sides to form a round ball, being careful not to over deflate it. Place the dough ball seam side down and then tighten into a ball by placing your hands on either side and rotating and pressing it into a firm ball. Place the dough into a floured round basket or bowl lined with floured linen. Cover and let it rest for an hour.
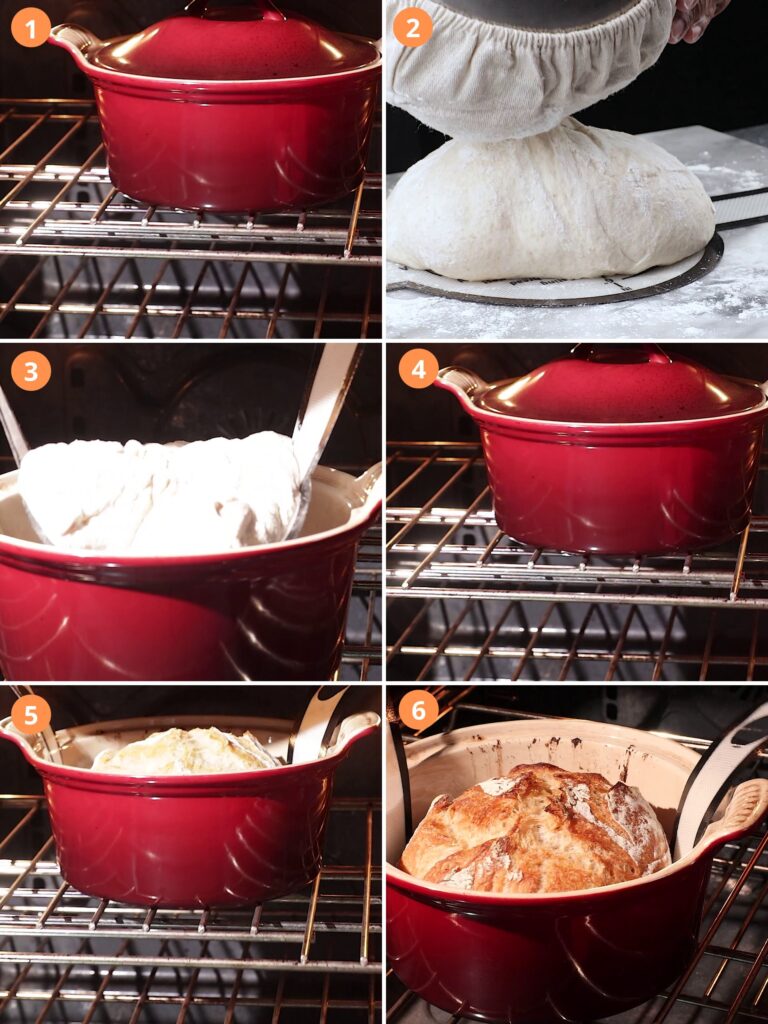
- Preheat the oven to 475°F. Place a covered Dutch oven or a heavy, oven-proof covered pot like a covered deep casserole dish in the middle rack and heat in the pre-heated oven for at least 30 minutes.
- Carefully pour the dough ball on a piece of parchment paper or a silicone bread sling. The dough will now be seam side up. There is no need to slash the dough with a sharp knife to allow for expansion because the seam will open as the dough bakes and create a gorgeous rustic pattern on top.
- Using oven mitts, open the oven door, uncover the preheated Dutch oven, and place the dough inside.
- Cover and bake for 30 minutes in the hot oven.
- After 30 minutes, uncover the Dutch oven and bake for an additional 10-15 minutes or until the top crust is golden brown. For the best results, let the fresh homemade bread cool on a wire rack for an hour before serving.

Tips & Tricks to Make the Best Bread
- Use whole wheat or rye flour in the poolish for a more intense flavor.
- Use active dry yeast for slow fermentation.
- The Dutch oven/casserole dish/other baking container or surface needs to heat up in the oven for at least a half hour.
- If using parchment, make sure you leave enough overhang so that you can easily place the dough into the oven Dutch oven.
- Don't use too much flour when manipulating the dough. The secret to the texture of this crusty bread recipe is the flour to water ratio. Adding extra flour will alter this ratio.
- Use oven mitts. Be sure to use oven mitts and be very careful when placing the dough into the hot Dutch oven.
- Using a scale is preferable to measuring cups. The amount of flour in a measuring cup can vary depending on how packed the flour is, to the current humidity. A baking best practice is to use a scale. If you do not have a scale, remember to place flour into the cup with a spoon then cut across the top with a knife to remove the excess.
Nutrition
A single serving of this no-knead bread recipe without Dutch oven has about 121 calories, 3.5 grams of protein, 0.3 grams of fat, and 25.5 grams of carbohydrates.
This no-knead bread recipe without Dutch oven yields approximately twelve servings. The nutrition guidance is intended for informational purposes only. Please use it as a general guideline. If the nutrition information is important to you, you should independently verify it using your preferred tool.
Storage
Room Temperature (Short Term): If you plan to eat the bread within 2-3 days, store the cooled bread in a paper bag or a bread box at room temperature. This will help maintain the crisp crust.
If the bread crust loses its crispiness, you can revive it by heating it in a preheated oven at 350°F for about 4-5 minutes. If the bread is very dry, spray it with some water before heating it in the oven.
Freezing: Stored in an airtight container, this artisan bread will last for up to 3 months in the freezer.
To thaw, leave the frozen bread on a counter at room temperature for a few hours or overnight in the refrigerator. Do not thaw in the microwave as this can make the bread soggy. Preheat the oven to 350°F and heat the thawed bread for about 4-5 minutes. This will revive its fresh-from-the-oven texture.
Variations
- Slather on some olive oil, fresh rosemary and sea salt to make focaccia.
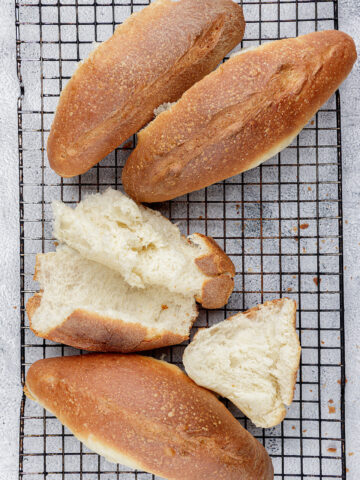
- Divide the dough into smaller balls and bake for dinner rolls.
- Drizzle olive oil and sprinkle with cherry tomatoes and crumbled feta and toast slices in the oven for a delicious bruscetta.
- Divide the dough into 4 pieces and make 4 small bread bowls.
- Vary the shape of the bread - make a long loaf, an oval loaf or even a thin flat loaf - like foccacia.
Serving Suggestions
Here are some fantastic ways to enjoy this delicious artisan bread:
- As a base for a grilled cheese sandwich.
- A dipping bread for soup or stew like our French Onion soup or stew.
- To make crostini.
- Plain, slathered with our Benihana Garlic Butter or olive oil.
- As a bread bowl. My favorite way to use this bread is to divide the dough into four pieces and make bread bowls. The crispy crust and soft yet chewy texture go particularly well with our Tomato Basil Bisque Soup.
FAQs
To make a round loaf, shape and place the dough in a round container or round bread linen-lined basket overnight. To make an oval loaf, shape the dough into an oval shape and place it in an oval container or oval linen-lined basket.
Rustic No Knead Bread Recipe Without A Dutch Oven
Ingredients
Poolish
- 100 grams whole wheat flour
- 100 milliliters water room temperature
- pinch active dry yeast
Rustic Bread
- 300 grams bread flour
- 220 milliliters water
- 0.4 grams active dry yeast
- 8 grams salt
Instructions
Day 1: Make the Poolish
- In a small bowl or plastic container, combine water and a little bit of yeast. Mix well. Add whole wheat flour to the mixture and stir until fully combined. Cover the bowl with a tight-fitting lid or plastic wrap and set it aside in a warm place, overnight.
Day # 2: Make the dough and let it proof the dough
- Uncover the poolish and add water and yeast to the dough. Mix thoroughly with the tick end of a wooden spoon. Transfer the mixture to a large mixing bowl. Add the flour over the poolish, then add the salt on top. Mix the dry ingredients until no visible flour remains. Cover and let the shaggy dough rest for 30 minutes (first rise).
- Fold the dough on all four sides, then cover and let it rest for 45 minutes. Uncover, and using wet hands, lift the dough from the bottom of one side and fold it over the top. Rotate the bowl a quarter turn and repeat the folding process. Continue rotating and folding three more times until all four sides of the dough have been folded. Cover and let the dough rest for 45 minutes (second rise). Repeat the folding process every 45 minutes, for a total of four times. By the end, the dough will feel silky and smooth. Cover and allow the bowl of dough to rest at room temperature for an overnight rise.
Day #3: Bake the Bread
- Sprinkle flour on the edges of the puffy dough and carefully pour it onto a well-floured work surface. Gently fold the dough from all sides to form a round ball, being careful not to over deflate it. Place the dough ball seam down and then tighten into a ball by placing your hands on either side and rotating and pressing it into a firm ball. Place the dough, seam side down into a floured round basket or bowl lined with floured linen. Cover and let it rest for an hour. Preheat the oven to 475°F. Place a covered Dutch oven or a heavy, oven-proof covered pot like a covered deep casserole dish in the middle rack. Heat the pot in the pre-heated oven for at least 30 minutes. Pour the dough on parchment paper or a bread sling seam side down. There is no need to slash the dough with a sharp knife to allow for expansion because the seam will open as the dough bakes creating a gorgeous rustic pattern on top. Using oven mitts, open the oven door, uncover the preheated Dutch oven, and place the dough inside. Cover and bake for 30 minutes in the hot oven. After 30 minutes, uncover the Dutch oven and bake for an additional 10-15 minutes or until the top crust is golden brown. For the best results, let the fresh homemade bread cool on a wire rack for about an hour before serving.
Video
Notes
- Use whole wheat or rye flour in the poolish for a more intense flavor.
- Use active dry yeast for slow fermentation.
- The Dutch oven/pot/baking surface needs to heat up in the oven for at least a half hour.
- If using parchment, make sure you leave enough overhang so that you can easily place the dough into the oven Dutch oven.
- Don't use too much flour when manipulating the dough. The secret to the texture of this crusty bread recipe is the flour to water ratio. Adding extra flour will alter this ratio.
- Use oven mitts. Be sure to use oven mitts and be very careful when placing the dough into the hot Dutch oven.
- Using a scale is preferable to measuring cups. The amount of flour in a measuring cup can vary depending on how packed the flour is, to the current humidity. A baking best practice is to use a scale. If you do not have a scale, remember to place flour into the cup with a spoon then cut across the top with a knife to remove the excess.
Nutrition
A single serving of this no-knead bread recipe without Dutch oven has about 121 calories, 3.5 grams of protein, 0.3 grams of fat, and 25.5 grams of carbohydrates. This no-knead bread recipe without Dutch oven yields approximately twelve servings. The nutrition guidance is intended for informational purposes only. Please use it as a general guideline. If the nutrition information is important to you, you should independently verify it using your preferred tool.Storage
Room Temperature (Short Term): If you plan to eat the bread within 2-3 days, store the cooled bread in a paper bag or a bread box at room temperature. This will help maintain the crisp crust. If the bread crust loses its crispiness, you can revive it by heating it in a preheated oven at 350°F for about 4-5 minutes. If the bread is very dry, spray it with some water before heating it in the oven. Freezing: Stored in an airtight container, this artisan bread will last for up to 3 months in the freezer. To thaw, leave the frozen bread on a counter at room temperature for a few hours or overnight in the refrigerator. Do not thaw in the microwave as this can make the bread soggy. Preheat the oven to 350°F and heat the thawed bread for about 4-5 minutes. This will revive its fresh-from-the-oven texture.
DID YOU MAKE THIS RECIPE?
We'd love to hear how it turned out. Please take a picture and tag us on Instagram @cloveandcumin!

MacKenzie
I have never made bread before but found this recipe and thought I would give it a try. My bread turned out great. This recipe is flawless.
Lima
Thank you MacKenzie - I am so glad you liked it!
Elisa
Love this rustic no knead bread recipe, looks delicious and fluffy, will make it soon. Thanks for sharing 🙂
Lima
Can't wait to hear what you think!
Lima
You are welcome. Thank you for commenting Elisa!
Nathan
This bread turned out perfectly, and it was great that it didn't require any kneading! I paired mine with a soup and a salad for a super tasty dinner.
Lima
So glad you liked it Nathan!