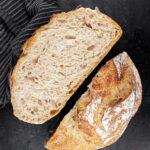
Rustic No Knead Bread Recipe Without A Dutch Oven
Our deliciously rustic no knead bread recipe delivers a jaw-dropping artisan bread with a thick crispy crust, a soft yet chewy crumb and big holes just like sourdough. No Dutch oven? We're not using one either! Read our post for a list of alternatives that work just as well.
Servings: 12 people
Calories: 121kcal
Ingredients
Poolish
- 100 grams whole wheat flour
- 100 milliliters water room temperature
- pinch active dry yeast
Rustic Bread
- 300 grams bread flour
- 220 milliliters water
- 0.4 grams active dry yeast
- 8 grams salt
Instructions
Day 1: Make the Poolish
- In a small bowl or plastic container, combine water and a little bit of yeast. Mix well. Add whole wheat flour to the mixture and stir until fully combined. Cover the bowl with a tight-fitting lid or plastic wrap and set it aside in a warm place, overnight.
Day # 2: Make the dough and let it proof the dough
- Uncover the poolish and add water and yeast to the dough. Mix thoroughly with the tick end of a wooden spoon. Transfer the mixture to a large mixing bowl. Add the flour over the poolish, then add the salt on top. Mix the dry ingredients until no visible flour remains. Cover and let the shaggy dough rest for 30 minutes (first rise).
- Fold the dough on all four sides, then cover and let it rest for 45 minutes. Uncover, and using wet hands, lift the dough from the bottom of one side and fold it over the top. Rotate the bowl a quarter turn and repeat the folding process. Continue rotating and folding three more times until all four sides of the dough have been folded. Cover and let the dough rest for 45 minutes (second rise). Repeat the folding process every 45 minutes, for a total of four times. By the end, the dough will feel silky and smooth. Cover and allow the bowl of dough to rest at room temperature for an overnight rise.
Day #3: Bake the Bread
- Sprinkle flour on the edges of the puffy dough and carefully pour it onto a well-floured work surface. Gently fold the dough from all sides to form a round ball, being careful not to over deflate it. Place the dough ball seam down and then tighten into a ball by placing your hands on either side and rotating and pressing it into a firm ball. Place the dough, seam side down into a floured round basket or bowl lined with floured linen. Cover and let it rest for an hour. Preheat the oven to 475°F. Place a covered Dutch oven or a heavy, oven-proof covered pot like a covered deep casserole dish in the middle rack. Heat the pot in the pre-heated oven for at least 30 minutes. Pour the dough on parchment paper or a bread sling seam side down. There is no need to slash the dough with a sharp knife to allow for expansion because the seam will open as the dough bakes creating a gorgeous rustic pattern on top. Using oven mitts, open the oven door, uncover the preheated Dutch oven, and place the dough inside. Cover and bake for 30 minutes in the hot oven. After 30 minutes, uncover the Dutch oven and bake for an additional 10-15 minutes or until the top crust is golden brown. For the best results, let the fresh homemade bread cool on a wire rack for about an hour before serving.
Video
Notes
- Use whole wheat or rye flour in the poolish for a more intense flavor.
- Use active dry yeast for slow fermentation.
- The Dutch oven/pot/baking surface needs to heat up in the oven for at least a half hour.
- If using parchment, make sure you leave enough overhang so that you can easily place the dough into the oven Dutch oven.
- Don't use too much flour when manipulating the dough. The secret to the texture of this crusty bread recipe is the flour to water ratio. Adding extra flour will alter this ratio.
- Use oven mitts. Be sure to use oven mitts and be very careful when placing the dough into the hot Dutch oven.
- Using a scale is preferable to measuring cups. The amount of flour in a measuring cup can vary depending on how packed the flour is, to the current humidity. A baking best practice is to use a scale. If you do not have a scale, remember to place flour into the cup with a spoon then cut across the top with a knife to remove the excess.