


While perfecting our Banh Mi bread recipe, we realized that this was no ordinary bake. Not only were there nuances about the ingredients, but the process of proofing and baking, made a huge difference. After weeks of testing, we reproduced that famous soft, cloud-like bread enclosed in an exquisitely crisp, eggshell-like crust. Here is the recipe, with all the tips and tricks you need, to make this fantastic baguette at home.
What is Banh Mi?
Banh Mi also known as Banh Mi Tay is a popular Vietnamese bread that has a rich history dating back to the era of French colonization in the 1880s. The term "Bánh Mì" in Vietnamese refers to bread itself, stemming from the word "Bánh," which is a broad category for baked goods. However, in the realm of Vietnamese cuisine, it is also synonymous with a specific type of short baguette, which is used to make the iconic Bánh Mì sandwich.
During Vietnam's French colonial period, various culinary elements of French cuisine were introduced to Vietnam, including French bread, pâté, coffee, crème caramel, yogurt, and more. Vietnamese bakers innovatively adapted the baguette, into a perfect bread for the famous Banh Mi sandwich, which is filled with tasty layers of flavor like like pork belly or tofu, pickled vegetables, fresh herbs, and condiments creating one of the world's most delicious sandwiches.
What is special about this Banh Mi bread recipe?
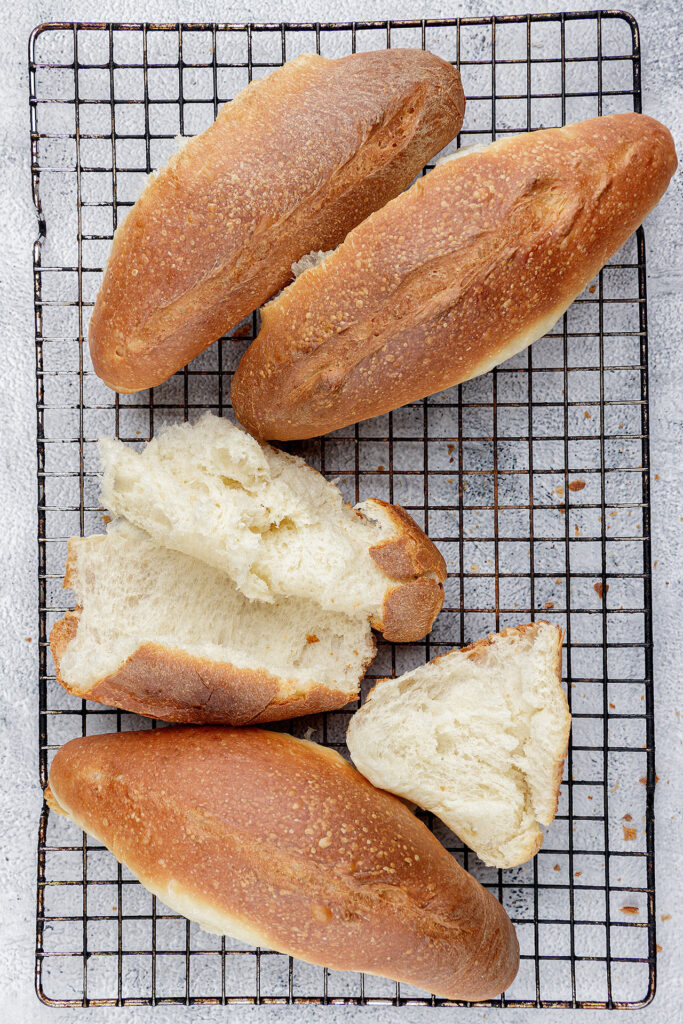
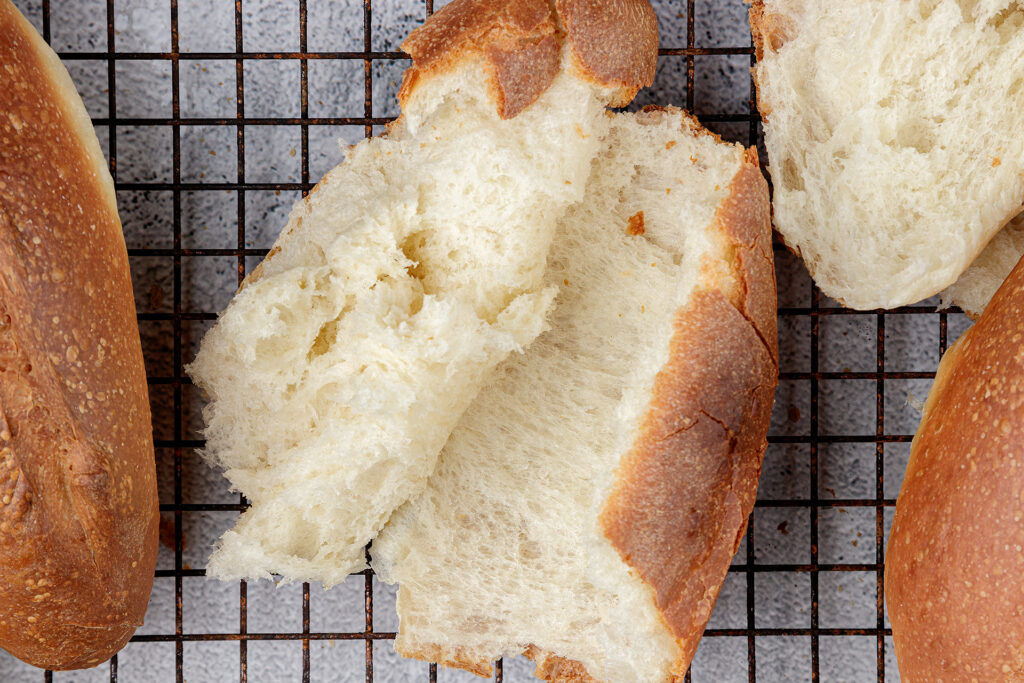
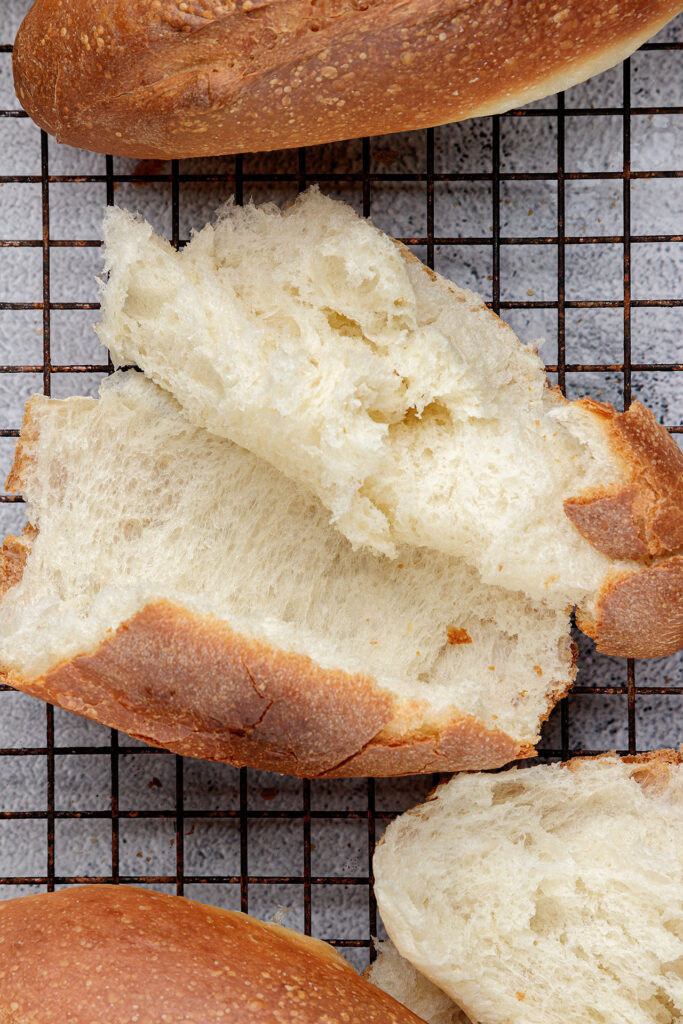
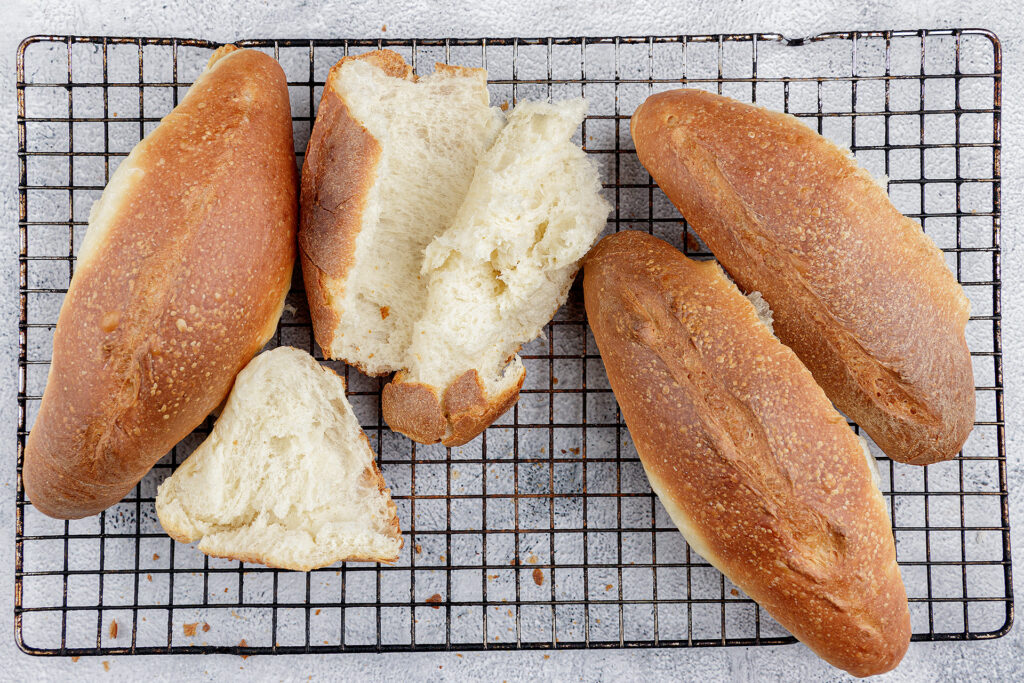
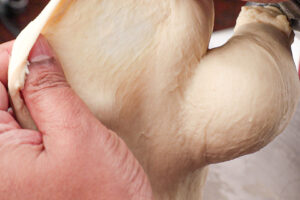
What sets Banh Mi apart is its exceptional lightness. The interior crumb is remarkably light and airy, almost cloud-like, while the crust is exquisitely thin and crispy like an eggshell, often displaying visible cracks. Unlike many other bread varieties, Banh Mi tends to remain soft and chewy even the day after, avoiding the common issue of drying out.
What is the secret to making banh mi in the home kitchen?
The secret to making banh mi is to add a dash of vinegar to the bread dough in addition to the oil and egg. A slightly acidic dough, drives the yeast to make more carbon dioxide helping to create the light and fluffy crumb. Once the banh mi is shaped, the dough needs to be sprayed with water every 15 minutes as its proofs and until it is baked to keep it moist. The banh mi should be baked first in high humidity heat then in regular dry heat to get the golden brown color.
Ingredients
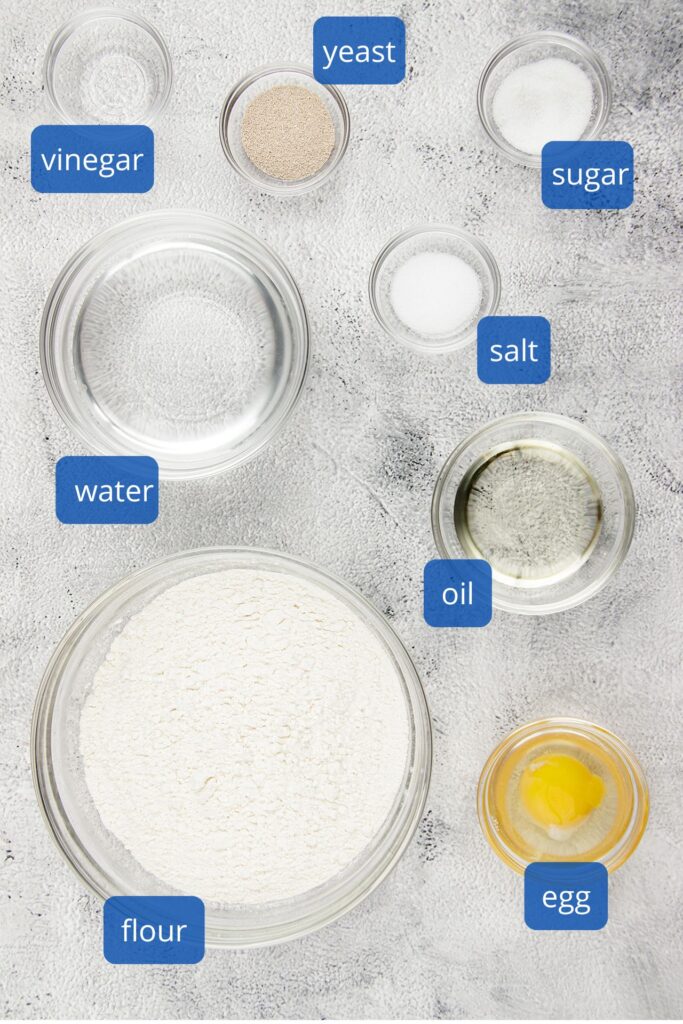
You don't need any specialized or hard-to-find ingredients to prepare Banh Mi. All the necessary items can be easily found at your neighborhood grocery store.
- Bread flour is the ideal choice for Banh Mi due to its elevated protein content. With a higher protein content, such as the 12.7% found in King Arthur's brand, it produces the distinctive tall, airy, cloud-like crumb characteristic of Banh Mi. While all-purpose flour can be used, its lower protein content (around 11.7%) is suboptimal, resulting in a denser, tighter crumb.
- Instant yeast is preferred because it saves time by acting more quickly than active dry yeast. While an equal amount of active dry yeast may be substituted, you should expect a longer rising time.
- Warm water is used to maximize fermentation activity. The water temperature when working with yeast is crucial. Yeast flourishes in warm water, becomes dormant in cold water, and perishes in excessively hot water.
- White granulated sugar boosts yeast activity, expedites dough rising, enhances crumb texture, and preserves moisture. Additionally, it contributes to the creating the crisp, brown crust that characterizes Banh Mi.
- Table salt is used as seasoning, enhancing the overall flavor of the bread. It is also used for its fine texture enabling it to rapidly and uniformly mix into the dough.
- The egg plays a crucial role in contributing to the structure, texture, and visual appeal of the final baked product. It provides moisture for a softer crumb, adds richness and flavor, and also contributes as a leavening agent for the bread to rise.
- White vinegar weakens the gluten molecules driving the yeast to make more carbon dioxide. This helps to create a lighter and fluffier crumb. You can also use apple cider vinegar or lemon juice to achieve a similar effect.
- Vegetable oil contributes to the moisture content, resulting in a softer and more tender crumb. It also plays a role in enhancing the richness of the bread and the crust texture.
A note on equipment
- Water spray bottle: The spray bottle is also used to spray the shaped dough with water to ensure that the outside is continuously moist during the proofing process of the shaped dough.
- Baguette Pan: In addition to a stand mixer with a dough hook attachment, we also use a baguette pan, which creates a more visually pleasing, rounded bottom for the Vietnamese bread. If you do not have a baguette pan, you can use parchment paper. The difference is that the parchment paper method will create a flat bottom which does not impact the quality of the bread in any way.
- Loaf pan and kitchen towel: To develop the crispy, eggshell crust, we do a high humidity bake in addition to a regular "dry" oven bake. To create the high humidity in the oven, we place a loaf pan filled with a kitchen towel filled with boiling water at the bottom rack of the oven. For additional humidity, we also use the spray bottle to spray the interior of the oven with water to create steam during the first phase of baking.
How to make this Banh Mi Bread Recipe
Step One: Mix and knead the dough.

- Add salt to the bread flour. Stir with a whisk to distribute the salt evenly. Set aside.
- Add warm water, instant yeast, sugar, egg and white vinegar into the bowl of a stand mixer. Whisk until well combined.
- Add the bread flour and salt mixture.
- Fit the stand mixer with a dough hook and lock the mixer in place. Mix the ingredients on a low speed for about 1 minute until both the wet and dry ingredients are combined. Increase the mixer speed to medium and mix for about 3 minutes. Finally, increase the speed to maximum (e.g., 10 on KitchenAid) and let it knead at full speed for approximately 8-10 minutes. You may need to hold the mixer to stabilize it as it could move due to the high speed.
Note: The dough is done when it is smooth and silky, no longer sticks to the bottom of the mixing bowl (a little may stick to the sides - that is okay). It should also pass the windowpane test. To do this, stretch a small piece of the dough into a rectangular shape. If you can stretch the dough into a thin, almost translucent membrane without tearing, it has passed the windowpane test.

Step Two: First Proof.
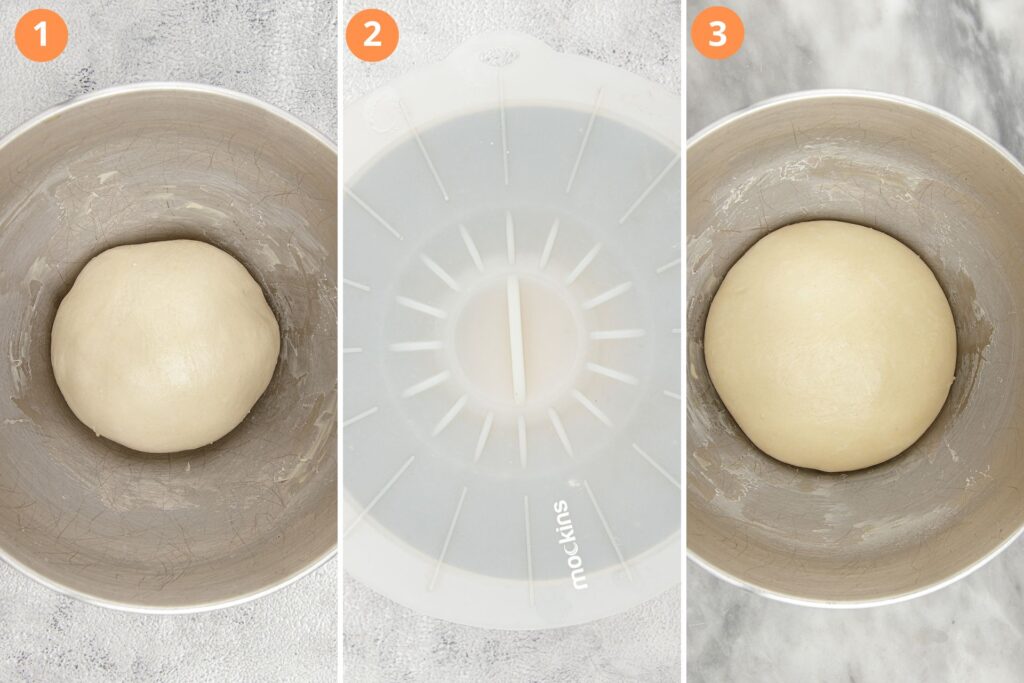
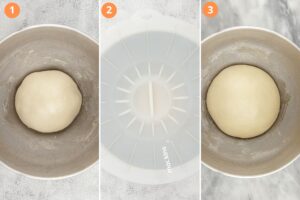
- Remove the bowl from the stand mixer. Transfer the smooth and silky dough from the hook or bowl of the stand mixer to a greased countertop. Shape the dough into a ball by pulling the sides and tucking them underneath. Drizzle a small amount of oil on top of the dough to act as a protective layer and prevent drying during the proofing period. Place the smooth dough ball into the stand mixer bowl.
- Cover the bowl with a silicone cover or towel.
- Let the dough rest in a warm place until it is 1.5x the original size about 30 minutes. Depending on the ambient temperature the time needed could range from about 20 minutes in the summer to 90 minutes in cooler weather.
Step Three: Second Proof
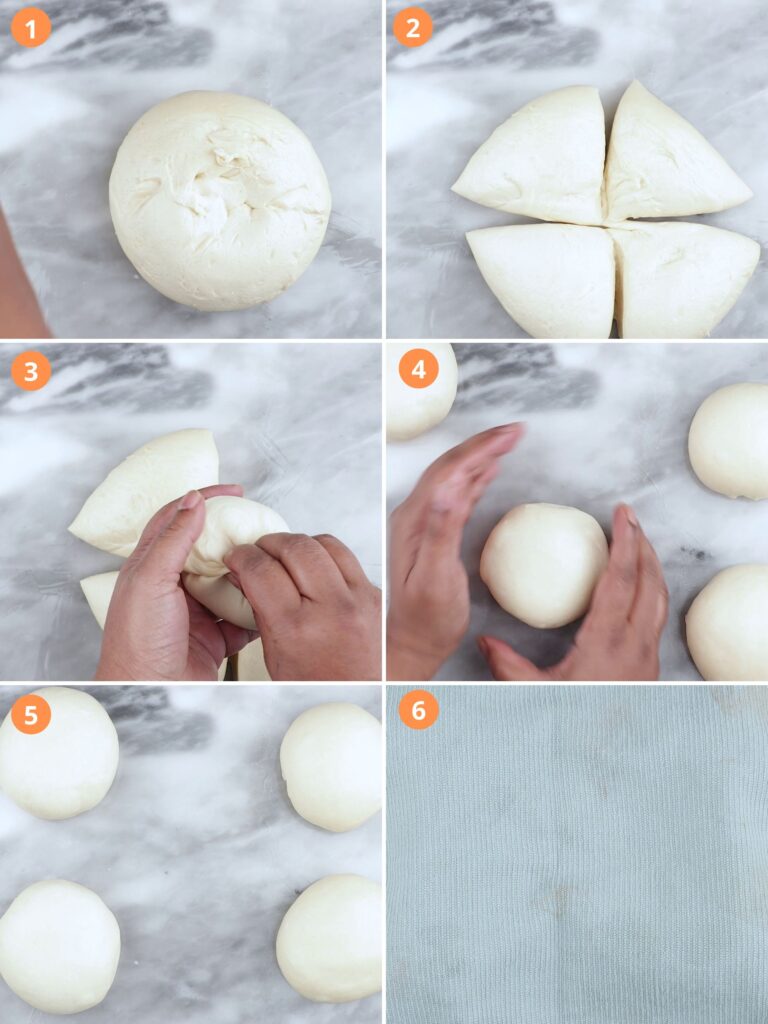
- Using a bench scraper, scrape the dough from the sides of the bowl. Pour the dough ball onto a lightly greased surface. Press the dough ball into a flatter round shape.
- Using the bench scraper, divide the dough into 4 equal parts (adjust for larger or smaller baguettes if desired).
- Take a piece of dough and shape it into a ball by pulling the sides and tucking them underneath. Place the round ball, seam side down onto a greased surface.
- Continue to shape it by rolling the dough with the cupped palms of your hands and pressing it down to make a compact ball.
- Place them evenly on the greased surface with enough space for each ball to double in size.
- Cover with a towel and rest for 30 minutes.
Step Four: Shape the banh mi

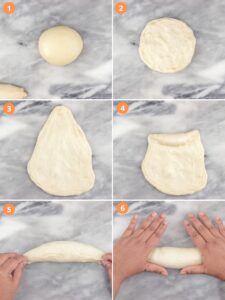
- Move the dough balls to one side of the greased surface.
- Take one dough ball and flatten it.
- Press the dough into a flat shape. Holding each side of the bottom, raise and vigorously slap the dough into a triangle onto the work surface. Flatten out the dough into a long triangular shape with your hands or a rolling pin, so that it is about 7 inches wide at the bottom.
- Starting from the narrow tip, shape the dough by rolling and pushing it at the ends. Push and pinch in each layer so that it creates a compact crescent shaped dough.
- For the final roll simply pinch in the dough so it seals in the dough.
- Place your hands flat on each end of the banh mi. Roll it back and forth a few times to make the pointed end. Repeat for the rest of the dough balls.
Step Four: Third Proof.
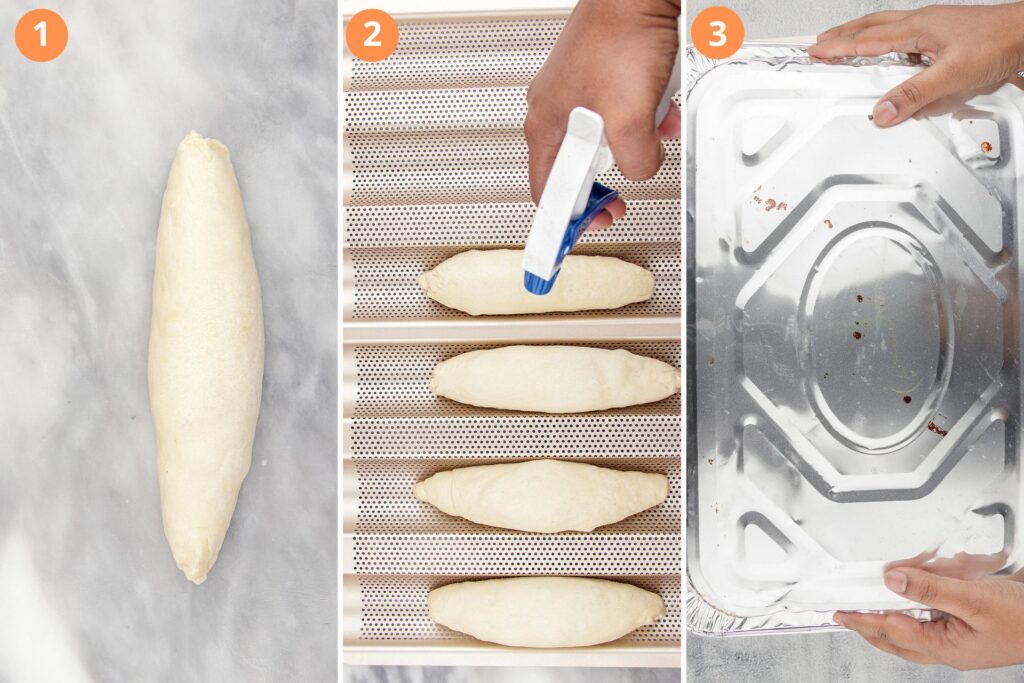
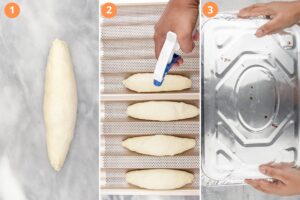
- Place the shaped baguettes into a baguette pan.
- Spray the banh mi with water. Place the baguette pan or pans on a baking tray so that you can easily place it in the oven later. Note: If you do not have a baguette pan, use a parchment lined baking tray and lift and fold the parchment paper between each banh mi so that there is a "wall" of parchment between each bread. There should be at least 3 inches of space between each side of the baguette to ensure adequate room for expansion. The benefit of using a baguette pan is that you get a rounded shape at the bottom half of the bread. Leave enough room between each banh mi as it will triple in size. In retrospect, to prevent sticking, I should have put the shaped baguettes in every other groove in the baguette pan.
- Cover with an inverted roaster tray or bowl. Do not cover it with a kitchen towel as the banh mi will stick to it. Spray water on the banh mi every 15 minutes until it triples in size - about 60 minutes.
Step Six: Bake the Banh Mi.
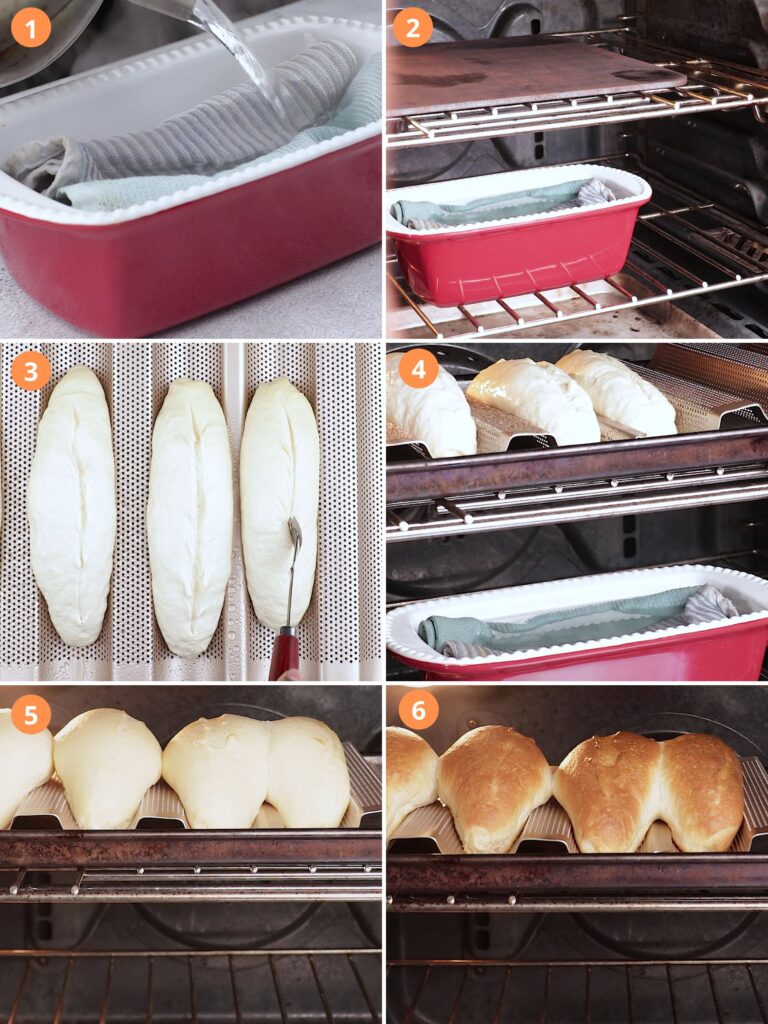
- Once the banh mi is close to triple its size, preheat the oven to 450°F. Place an oven rack in the middle of the oven and one directly beneath it with enough space for a loaf pan or oven safe pot which will contain water. Boil a kettle of water. Place 1-2 towels in a loaf pan or oven-safe pot. Place the loaf pan on a baking sheet so that it is easier to place in the oven. Pour the boiling water into the loaf pan until the water is filled almost to the top.
- Place the loaf pan with the boiling water towards the front of the oven on the bottom rack. The loaf pan with boiling water should be in the preheated oven 15 minutes before the bread goes in.
- Using a razor blade or a very sharp knife (greasing the edge helps), score each loaf with 2-3 cuts at a 45° angle. You can also make a long vertical cut. Spray the banh mi with water once more.
- Place the banh mi onto the middle rack, placing the baking tray toward the back of the oven so that there is a small space in the front for steam from the loaf pan to quickly circulate towards the banh mi. Liberally spray the banh mi and the inside of the oven so that the oven fills with steam. Quickly close the oven door. Bake at high humidity for about 10 minutes.
- After baking for 10 minutes, open the hot oven door to release any steam. Using oven mitts, remove the loaf pan with the water. The banh mi will look very pale.
- Close the door and "dry bake" for 15-20 minutes or until you achieve the desired color.
Step Seven: Cool the Banh Mi
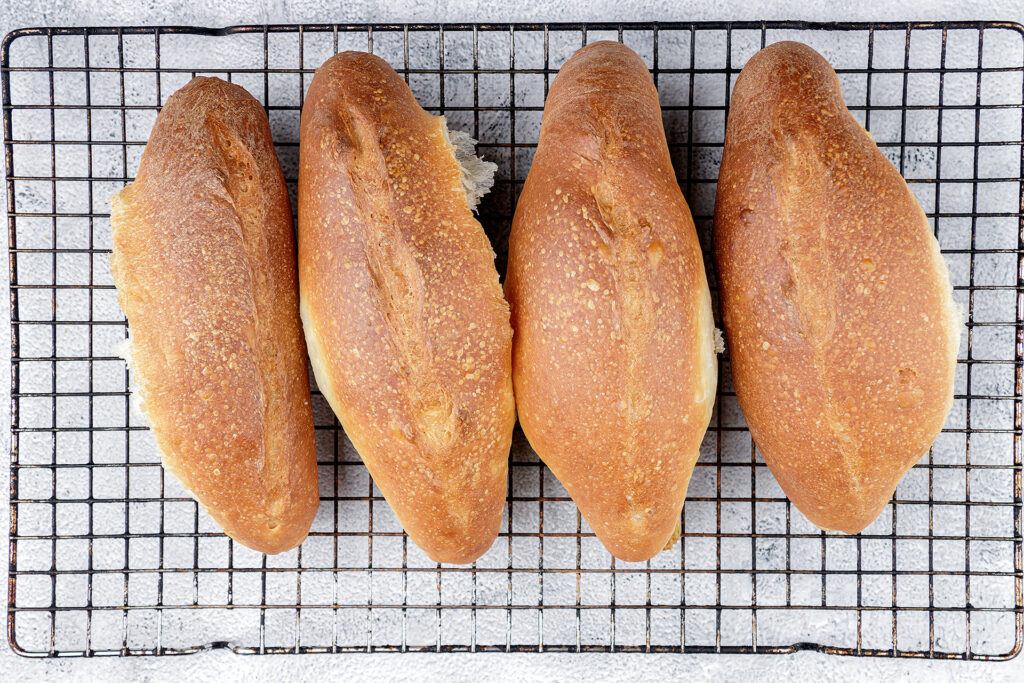
- Remove the banh mi from the oven and place the loaves on a cooling rack. It is normal for cracks to form within 5-10 minutes as the loaves cool. If you like, lightly brush the banh mi with butter for a nice shine.
Tips for making the best Banh Mi Bread
- Use the windowpane test: The windowpane test is an easy way to determine whether the gluten in the dough has developed enough. To test, stretch a small piece of the dough into a rectangular shape. If you can stretch the dough into a thin, almost translucent membrane without tearing, it has passed the windowpane test, and you can proceed to proofing. If it tears, knead the dough a few more minutes and retest.
- Dough rising time: The amount of time needed for the dough to rise will depend on the ambient temperature. Colder temperatures will result in a longer proofing time than warmer temperatures. If it is very cold, you can proof the dough in an oven with the light on for a little warmth or use the proofing function if you have one in your oven. The best way to know whether the dough has risen enough is by looking at the amount of the rise.
- Mist the oven: It is vital to mist the inside of the oven just before closing the oven door to bake the bread.
- Score the dough: Before baking, score the dough with 2-3 cuts at a 45° angle using a sharp razor blade or knife. Do not skip this step as it allows the bread to expand properly during baking and also creates the signature Banh Mi appearance.
- Banh Mi shaped dough should be ⅓ of the width of the baguette pan groove: For perfectly shaped banh mi baguettes, try to make the width of the banh mi about a third of the baguette groove. As you can see in the pictures, my banh mi was about a little more than half the size of the baguette groove. As a result, some of my breads overflowed and stuck together. Alternatively, you can also put the shaped dough in every other baguette groove and if using parchment paper, a 3 inch expansion allowance on each side.
Nutrition
A single serving of this Banh Mi bread recipe has about 341 calories, 9.3 grams of protein, 8.7 grams of fat, and 55.4 grams of carbohydrates.
This Banh Mi Tay bread recipe yields approximately four servings. The nutrition guidance is intended for informational purposes only. Please use it as a general guideline. If the nutrition information is important to you, you should independently verify it using your preferred tool.
Storage and Freezer Instructions
Room Temperature (Short Term): If you plan to consume the Banh Mi bread within a day or two, you can store it at room temperature. Place the bread in a paper bag or a bread bag to maintain its crisp crust.
If the bread starts to lose its crispiness, you can reheat it in a preheated oven at 350°F for about 4-5 minutes. This will help revive the crust. If the bread is very dry, spray it with some water before heating it in the oven.
Freezing: Stored in an airtight container or packaging, Banh Mi will last for up to 3 months in the freezer.
To thaw, leave the frozen Banh Mi Tay on a counter at room temperature for a few hours or overnight in the refrigerator. Do not thaw in the microwave as this can make the bread soggy. To restore the crispy crust, preheat your oven to 350°F. Place the thawed bread directly on the oven rack and heat for about 4-5 minutes. This will bring back its fresh-from-the-oven texture.

How to serve Banh Mi bread
- Banh Mi sandwich. The most popular way to serve Banh Mi bread is as the base for Banh Mi sandwiches. To make this popular street food, start by slicing a Banh Mi bread horizontally, leaving one side intact. Spread a thin layer of mayonnaise and sriracha sauce on the inside of the bread. Layer on your choice of protein, such as grilled pork, tofu, or chicken, followed by pickled carrots or other veggies like daikon radishes, slices of cucumber, and a generous amount of fresh cilantro leaves. Optional ingredients like fresh vegetables e.g., jalapeño peppers, avocado, or a drizzle of hoisin sauce, soy sauce, or lime juice for extra flavor can also be added. Gently press the top of the Banh Mi bread onto the fillings to close the sandwich, and it's ready to enjoy—savory, sweet, spicy, and tangy flavors all wrapped up in a crispy and soft bread.
- Other fillings. While the traditional banh mi sandwich is delicious, homemade banh mi baguettes also go really well with regular sandwich fillings like thinly sliced pot roast, falafel, spicy beef kababs, and hibachi vegetables. Elevate your sandwich to a new level by adding layering sumac onions and Greek salad then drizzling with tangy Tzatziki and our delectable Indian mint yogurt sauce.
- Bread appetizer or side. With its deliciously chewy crust and soft interior Banh Mi is delicious as a bread appetizer with olive oil or our delicious Benihana garlic butter. You can also eat it with hearty stews of soups like French Onion Soup Without Wine.
- Bruschetta: Slice the Banh Mi bread into smaller pieces, toast them, and use them as a base for bruschetta. Top with diced tomatoes, basil, garlic, and olive oil for a Vietnamese twist on this Italian classic.
- Crostini: Like bruschetta, slice the Banh Mi bread into thin rounds, toast, and serve as crostini. Top the crusty bread with various spreads, like tapenade, hummus, or pâté, along with complementary toppings.
FAQs
Banh Mi or Banh Mi Tay is a Vietnamese baguette known for its light and crispy crust and airy interior. It's used as the base for Banh Mi sandwiches.
Yes, you can substitute all-purpose flour for bread flour in the Banh Mi bread recipe. However, the texture may be slightly different, as bread flour has a higher protein content, which helps develop gluten for a chewier crumb.
You can perform the windowpane test. Pinch off a small piece of dough and gently stretch it between your fingers. If it becomes translucent and stretches without tearing, the dough is ready.
You can use active dry yeast as a substitute for instant yeast. Keep in mind that the rise time may be slightly longer with active dry yeast, so monitor the dough's volume to determine readiness.
Store leftover Banh Mi bread at room temperature in a paper bag or bread bag for a day or two. If you plan to keep it longer, freeze it in an airtight container or plastic wrap for up to three months.
Preheat your oven to 350°F and place the bread directly on the oven rack for about 4-5 minutes. This will help revive its crispy crust.
Yes, you can divide the dough into smaller or larger portions to make Banh Mi rolls or larger baguettes. Adjust the baking time accordingly.
Common fillings include grilled or roasted meats like pork, chicken, beef or tofu for vegetarian options, pickled vegetables, cucumber slices, cilantro, and optional condiments like mayonnaise and sriracha sauce.
Yes, you can adapt the Banh Mi bread recipe to create a sweet version by adding sugar and flavorings like vanilla or cinnamon to the dough. Serve it with sweet toppings or turn it into bread pudding.
Banh Mi bread can be used to make items like Banh Mi pizza, bruschetta, crostini, croutons, and even French toast. It's a versatile ingredient for both sweet and savory dishes.
Banh Mi has a thin, flaky, egg shell-like crust and is soft and cloud-like in the middle, unlike traditional French baguettes, which has an open crumb and is chewier, with a harder exterior.
According to Andre Nguyen, the secret to the crisp crust of Banh Mi bread is not rice flour. In fact, since rice flour does not contain gluten like wheat flour, it creates a very dense, inedible loaf.
During the early 20th century, Vietnamese bakers creatively adapted the French baguette-making process to include rice flour, resulting in a unique hybrid known as "Bánh Mì Tay" or "Western-style Bánh Mì." While this innovation provided a distinctive texture and flavor, the traditional Banh Mi bread recipe, as enjoyed today, typically omits rice flour.
The hot wet towels create steady and continuous steam which gives the banh mi loaves more volume and a delightfully crispy crust.
Banh Mi Bread Recipe - Vietnamese Sandwich Baguette
Equipment
- Water spray bottle
- Baguette pan optional, you can also use parchment paper
- Loaf pan or oven proof container
- 1-2 kitchen towels
Ingredients
- 2 ¼ cups bread flour 300 grams
- ⅔ cup warm water 155 milliliters
- 1 egg large
- 1 teaspoon white granulated sugar 5 grams
- ¾ teaspoon table salt 5 grams
- 1 ¾ teaspoon instant yeast 5 grams
- ¼ teaspoon white vinegar
- 2 Tablespoons vegetable oil 30 milliliters and more for greasing the dough
Instructions
Step One - Mix and knead the dough
- (1) Add salt to the bread flour. Stir with a whisk to distribute the salt evenly. Set aside.(2) Add warm water, instant yeast, sugar, egg and white vinegar into the bowl of a stand mixer. Whisk until well combined.(3) Add the bread flour and salt mixture.(4) Fit the stand mixer with a dough hook and lock the mixer in place. Mix the ingredients on a low speed for about 1 minute until both the wet and dry ingredients are combined. Increase the mixer speed to medium and mix for about 3 minutes. Finally, increase the speed to maximum (e.g., 10 on KitchenAid) and let it knead at full speed for approximately 8-10 minutes. You may need to hold the mixer to stabilize it as it could move due to the high speed.
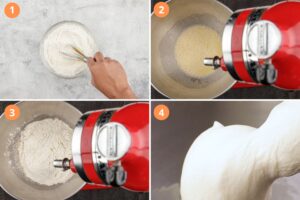
- Windowpane Test: The dough is done when it is smooth and silky, no longer sticks to the bottom of the mixing bowl (a little may stick to the sides - that is okay). It should also pass the windowpane test. To do this, stretch a small piece of the dough into a rectangular shape. If you can stretch the dough into a thin, almost translucent membrane without tearing, it has passed the windowpane test.
Step Two: Cover the dough and rest for the first proof
- (1) Remove the bowl from the stand mixer. Transfer the smooth and silky dough from the hook or bowl of the stand mixer to a greased countertop. Shape the dough into a ball by pulling the sides and tucking them underneath. Drizzle a small amount of oil on top of the dough to act as a protective layer and prevent drying during the proofing period. Place the smooth dough ball into the stand mixer bowl.(2) Cover the bowl with a silicone cover or towel.(3) Let the dough rest in a warm place until it is 1.5x the original size about 30 minutes. Depending on the ambient temperature the time needed could range from about 20 minutes in the summer to 90 minutes in cooler weather.
Step Three - Divide the dough, shape and proof a second time
- (1) Using a bench scraper, scrape the dough from the sides of the bowl. Pour the dough ball onto a lightly greased surface. Press the dough ball into a flatter round shape.(2) Using the bench scraper, divide the dough into 4 equal parts (adjust for larger or smaller baguettes if desired).(3) Take a piece of dough and shape it into a ball by pulling the sides and tucking them underneath. Place the round ball, seam side down onto a greased surface.(4) Continue to shape it by rolling the dough with the cupped palms of your hands and pressing it down to make a compact ball.(5) Place them evenly on the greased surface with enough space for each ball to double in size.(6) Cover with a towel and rest for 30 minutes.

Step Four - Shape the Banh Mi
- (1) Move the dough balls to one side of the greased surface.(2) Take one dough ball and flatten it.(3) Press the dough into a flat shape. Holding each side of the bottom, raise and vigorously slap the dough into a triangle onto the work surface. Flatten out the dough into a long triangular shape with your hands or a rolling pin, so that it is about 7 inches wide at the bottom.(4) Starting from the narrow tip, shape the dough by rolling and pushing it at the ends. Push and pinch in each layer so that it creates a compact crescent shaped dough.(5) For the final roll simply pinch in the dough so it seals in the dough.(6) Place your hands flat on each end of the banh mi. Roll it back and forth a few times to make the pointed end. Repeat for the rest of the dough balls.
Step Five - Third Proof - Cover and spray the banh mi every 15 minutes
- (1) Place the shaped baguettes into a baguette pan. (2) Spray the banh mi with water. Place the baguette pan or pans on a baking tray so that you can easily place it in the oven later. Note: If you do not have a baguette pan, use a parchment lined baking tray and lift and fold the parchment paper between each banh mi so that there is a "wall" of parchment between each bread. There should be at least 3 inches of space between each side of the baguette to ensure adequate room for expansion. The benefit of using a baguette pan is that you get a rounded shape at the bottom half of the bread. Leave enough room between each banh mi as it will triple in size. In retrospect, to prevent sticking, I should have put the shaped baguettes in every other groove in the baguette pan.(2) Cover with an inverted roaster tray or bowl. Do not cover it with a kitchen towel as the banh mi will stick to it. Spray water on the banh mi every 15 minutes until it triples in size - about 60 minutes.
Step Six - Bake the Banh Mi
- (1) Once the banh mi is close to triple its size, preheat the oven to 450°F. Place an oven rack in the middle of the oven and one directly beneath it with enough space for a loaf pan or oven safe pot which will contain water. Boil a kettle of water. Place 1-2 towels in a loaf pan or oven-safe pot. Place the loaf pan on a baking sheet so that it is easier to place in the oven. Pour the boiling water into the loaf pan until the water is filled almost to the top.(2) Place the loaf pan with the boiling water towards the front of the oven on the bottom rack. The loaf pan with boiling water should be in the preheated oven 15 minutes before the bread goes in.(3) Using a razor blade or a very sharp knife (greasing the edge helps), score each loaf with 2-3 cuts at a 45° angle. You can also make a long vertical cut. Spray the banh mi with water once more.(4) Place the banh mi onto the middle rack, placing the baking tray toward the back of the oven so that there is a small space in the front for steam from the loaf pan to quickly circulate towards the banh mi. Liberally spray the banh mi and the inside of the oven so that the oven fills with steam. Quickly close the oven door. Bake at high humidity for about 10 minutes.(5) After baking for 10 minutes, open the hot oven door to release any steam. Using oven mitts, remove the loaf pan with the water. The banh mi will look very pale.(6) Close the door and "dry bake" for 15-20 minutes or until you achieve the desired color.

Step Seven: Cool the Banh Mi
- Remove the banh mi from the oven and place the loaves on a cooling rack. It is normal for cracks to form within 5-10 minutes as the loaves cool. If you like, lightly brush the banh mi with butter for a nice shine.

Video
Notes
- Use the windowpane test: The windowpane test is an easy way to determine whether the gluten in the dough has developed enough. To test, stretch a small piece of the dough into a rectangular shape. If you can stretch the dough into a thin, almost translucent membrane without tearing, it has passed the windowpane test, and you can proceed to proofing. If it tears, knead the dough a few more minutes and retest.
- Dough rising time: The amount of time needed for the dough to rise will depend on the ambient temperature. Colder temperatures will result in a longer proofing time than warmer temperatures. If it is very cold, you can proof the dough in an oven with the light on for a little warmth or use the proofing function if you have one in your oven. The best way to know whether the dough has risen enough is by looking at the amount of the rise.
- Mist the oven: It is vital to mist the inside of the oven just before closing the oven door to bake the bread.
- Score the dough: Before baking, score the dough with 2-3 cuts at a 45° angle using a sharp razor blade or knife. Do not skip this step as it allows the bread to expand properly during baking and also creates the signature Banh Mi appearance.
- Banh Mi shaped dough should be ⅓ of the width of the baguette pan groove: For perfectly shaped banh mi baguettes, try to make the width of the banh mi about a third of the baguette groove. As you can see in the pictures, my banh mi was about a little more than half the size of the baguette groove. As a result, some of my breads overflowed and stuck together. Alternatively, you can also put the shaped dough in every other baguette groove and if using parchment paper, a 3 inch expansion allowance on each side.

DID YOU MAKE THIS RECIPE?
We'd love to hear how it turned out. Please take a picture and tag us on Instagram @cloveandcumin!

Shashi at Savory Spin
This was such an awesome baguette - thanks so much for the recipe and steps, made the whole process so eacy!
Lima
Awesome! Thank you for commenting Shashi!
Brandi
Thanks for providing the detailed step by step instructions. This recipe if foolproof using all of your tips.
Lima
You are welcome!
Holly
I am always up for trying out new recipes and this one did not disappoint! It was so fun to make and the results were delicious. I can't wait to try out some of your other recipes.
Lima
Awesome. Thanks!
Caroline
I love how fluffy these look inside, just the right texture to take on those tasty fillings 🙂
Stephanie
Oh my! This Banh Mi bread is pure heaven. The inside is fluffy and tasteful and the crust is crunchy and satisfying. Thanks for the detailed instructions - made making this recipe easy for an beginning bread maker.
Lima
Absolutely thrilled! Thank you!
Carrie Robinson
The bread is probably my favorite part of a good banh mi sandwich! 🙂 This looks perfect.
MacKenzie
The crispy crust is heavenly. I can't wait to make this and enjoy with my soup tonight. Great this time of year
Andrea
This bahn mi looks so light and airy on the inside. I could eat it with butter and be happy but I'm sure it makes the best sandwiches.
Lima
It really does - we love this wonderful recipe from Vietnam!
Lima
Awesome - please let us know how it goes!
Kechi
This sandwich bread looks phenomenal and making me hungry!!! Thanks for the tips/notes. Will like to try it.
Lima
Please let us know how it goes!!
Holley
I love how light and airy the inside of this bread is! Easy to follow instructions and super tasty! Thanks for sharing!
Sisley
I love making bread and this was a first for me. The results were delicious.
Lima
Fantastic - I am so glad you liked it!
Anjali
This banh mi baguette turned out perfectly! It tasted just like my favorite Vietnamese place where I usually get their sandwiches - and it was fun recreating it at home!
Lima
I am so glad! Thank you so much for your comment Anjali!