Banh Mi Bread Recipe - Vietnamese Sandwich Baguette
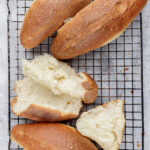
Learn how to make Banh Mi - the ultimate Vietnamese sandwich baguette. With its soft, spongy, cloud-like crumb and exquisitely thin crispy crust, this bread recipe elevate your sandwiches to a whole new level of deliciousness.
Servings: 6 people
Calories: 341kcal
Equipment
- Water spray bottle
- Baguette pan optional, you can also use parchment paper
- Loaf pan or oven proof container
- 1-2 kitchen towels
Ingredients
- 2 ¼ cups bread flour 300 grams
- ⅔ cup warm water 155 milliliters
- 1 egg large
- 1 teaspoon white granulated sugar 5 grams
- ¾ teaspoon table salt 5 grams
- 1 ¾ teaspoon instant yeast 5 grams
- ¼ teaspoon white vinegar
- 2 Tablespoons vegetable oil 30 milliliters and more for greasing the dough
Instructions
Step One - Mix and knead the dough
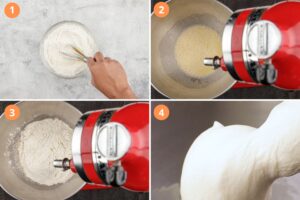
- (1) Add salt to the bread flour. Stir with a whisk to distribute the salt evenly. Set aside.(2) Add warm water, instant yeast, sugar, egg and white vinegar into the bowl of a stand mixer. Whisk until well combined.(3) Add the bread flour and salt mixture.(4) Fit the stand mixer with a dough hook and lock the mixer in place. Mix the ingredients on a low speed for about 1 minute until both the wet and dry ingredients are combined. Increase the mixer speed to medium and mix for about 3 minutes. Finally, increase the speed to maximum (e.g., 10 on KitchenAid) and let it knead at full speed for approximately 8-10 minutes. You may need to hold the mixer to stabilize it as it could move due to the high speed.
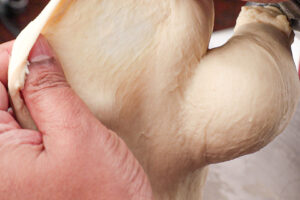
- Windowpane Test: The dough is done when it is smooth and silky, no longer sticks to the bottom of the mixing bowl (a little may stick to the sides - that is okay). It should also pass the windowpane test. To do this, stretch a small piece of the dough into a rectangular shape. If you can stretch the dough into a thin, almost translucent membrane without tearing, it has passed the windowpane test.
Step Two: Cover the dough and rest for the first proof
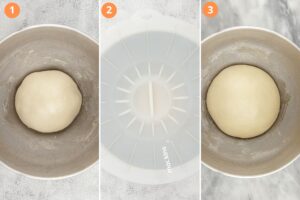
- (1) Remove the bowl from the stand mixer. Transfer the smooth and silky dough from the hook or bowl of the stand mixer to a greased countertop. Shape the dough into a ball by pulling the sides and tucking them underneath. Drizzle a small amount of oil on top of the dough to act as a protective layer and prevent drying during the proofing period. Place the smooth dough ball into the stand mixer bowl.(2) Cover the bowl with a silicone cover or towel.(3) Let the dough rest in a warm place until it is 1.5x the original size about 30 minutes. Depending on the ambient temperature the time needed could range from about 20 minutes in the summer to 90 minutes in cooler weather.
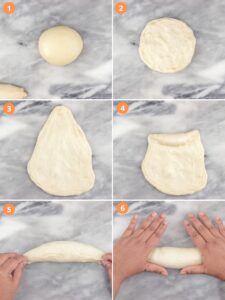
Step Three - Divide the dough, shape and proof a second time
- (1) Using a bench scraper, scrape the dough from the sides of the bowl. Pour the dough ball onto a lightly greased surface. Press the dough ball into a flatter round shape.(2) Using the bench scraper, divide the dough into 4 equal parts (adjust for larger or smaller baguettes if desired).(3) Take a piece of dough and shape it into a ball by pulling the sides and tucking them underneath. Place the round ball, seam side down onto a greased surface.(4) Continue to shape it by rolling the dough with the cupped palms of your hands and pressing it down to make a compact ball.(5) Place them evenly on the greased surface with enough space for each ball to double in size.(6) Cover with a towel and rest for 30 minutes.

Step Four - Shape the Banh Mi
- (1) Move the dough balls to one side of the greased surface.(2) Take one dough ball and flatten it.(3) Press the dough into a flat shape. Holding each side of the bottom, raise and vigorously slap the dough into a triangle onto the work surface. Flatten out the dough into a long triangular shape with your hands or a rolling pin, so that it is about 7 inches wide at the bottom.(4) Starting from the narrow tip, shape the dough by rolling and pushing it at the ends. Push and pinch in each layer so that it creates a compact crescent shaped dough.(5) For the final roll simply pinch in the dough so it seals in the dough.(6) Place your hands flat on each end of the banh mi. Roll it back and forth a few times to make the pointed end. Repeat for the rest of the dough balls.
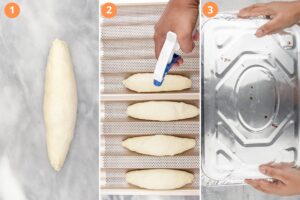
Step Five - Third Proof - Cover and spray the banh mi every 15 minutes
- (1) Place the shaped baguettes into a baguette pan. (2) Spray the banh mi with water. Place the baguette pan or pans on a baking tray so that you can easily place it in the oven later. Note: If you do not have a baguette pan, use a parchment lined baking tray and lift and fold the parchment paper between each banh mi so that there is a "wall" of parchment between each bread. There should be at least 3 inches of space between each side of the baguette to ensure adequate room for expansion. The benefit of using a baguette pan is that you get a rounded shape at the bottom half of the bread. Leave enough room between each banh mi as it will triple in size. In retrospect, to prevent sticking, I should have put the shaped baguettes in every other groove in the baguette pan.(2) Cover with an inverted roaster tray or bowl. Do not cover it with a kitchen towel as the banh mi will stick to it. Spray water on the banh mi every 15 minutes until it triples in size - about 60 minutes.
Step Six - Bake the Banh Mi
- (1) Once the banh mi is close to triple its size, preheat the oven to 450°F. Place an oven rack in the middle of the oven and one directly beneath it with enough space for a loaf pan or oven safe pot which will contain water. Boil a kettle of water. Place 1-2 towels in a loaf pan or oven-safe pot. Place the loaf pan on a baking sheet so that it is easier to place in the oven. Pour the boiling water into the loaf pan until the water is filled almost to the top.(2) Place the loaf pan with the boiling water towards the front of the oven on the bottom rack. The loaf pan with boiling water should be in the preheated oven 15 minutes before the bread goes in.(3) Using a razor blade or a very sharp knife (greasing the edge helps), score each loaf with 2-3 cuts at a 45° angle. You can also make a long vertical cut. Spray the banh mi with water once more.(4) Place the banh mi onto the middle rack, placing the baking tray toward the back of the oven so that there is a small space in the front for steam from the loaf pan to quickly circulate towards the banh mi. Liberally spray the banh mi and the inside of the oven so that the oven fills with steam. Quickly close the oven door. Bake at high humidity for about 10 minutes.(5) After baking for 10 minutes, open the hot oven door to release any steam. Using oven mitts, remove the loaf pan with the water. The banh mi will look very pale.(6) Close the door and "dry bake" for 15-20 minutes or until you achieve the desired color.

Step Seven: Cool the Banh Mi
- Remove the banh mi from the oven and place the loaves on a cooling rack. It is normal for cracks to form within 5-10 minutes as the loaves cool. If you like, lightly brush the banh mi with butter for a nice shine.

Video
Notes
- Use the windowpane test: The windowpane test is an easy way to determine whether the gluten in the dough has developed enough. To test, stretch a small piece of the dough into a rectangular shape. If you can stretch the dough into a thin, almost translucent membrane without tearing, it has passed the windowpane test, and you can proceed to proofing. If it tears, knead the dough a few more minutes and retest.
- Dough rising time: The amount of time needed for the dough to rise will depend on the ambient temperature. Colder temperatures will result in a longer proofing time than warmer temperatures. If it is very cold, you can proof the dough in an oven with the light on for a little warmth or use the proofing function if you have one in your oven. The best way to know whether the dough has risen enough is by looking at the amount of the rise.
- Mist the oven: It is vital to mist the inside of the oven just before closing the oven door to bake the bread.
- Score the dough: Before baking, score the dough with 2-3 cuts at a 45° angle using a sharp razor blade or knife. Do not skip this step as it allows the bread to expand properly during baking and also creates the signature Banh Mi appearance.
- Banh Mi shaped dough should be ⅓ of the width of the baguette pan groove: For perfectly shaped banh mi baguettes, try to make the width of the banh mi about a third of the baguette groove. As you can see in the pictures, my banh mi was about a little more than half the size of the baguette groove. As a result, some of my breads overflowed and stuck together. Alternatively, you can also put the shaped dough in every other baguette groove and if using parchment paper, a 3 inch expansion allowance on each side.