


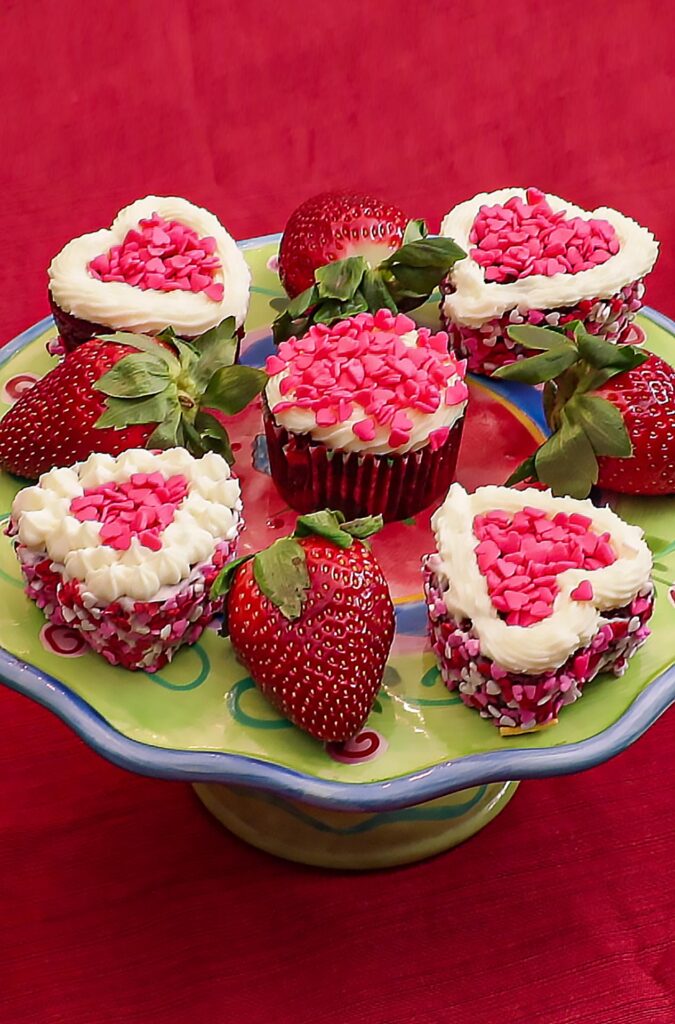
These stunning mini red velvet cakes are an ideal choice for a special occasion, like Valentine's Day. Featuring a super soft velvety texture, a hint of chocolate, and a subtle richness from buttermilk, these incredibly moist mini red velvet cakes with cream cheese frosting promise to add a touch of elegance to your festive celebrations.
Why this recipe works
The allure of these mini red velvet cupcakes lies in the enchanting blend of flavors and textures. The moist and tender cakes, paired with the tangy cream cheese frosting, create a symphony of sweetness. Here's why this recipe is the key to a delightful Valentine's Day celebration:
- Romantic Flavors: True to its name, these mini cakes are velvety soft, moist and the rich red color makes for a stunning presentation. The perfect contrast of the slightly tangy cream cheese frosting and the luxurious red velvet crumb is perfect for special occasions.
- Perfect Texture: With its super moist and tender crumb, these mini cakes promise a truly delightful eating experience.
- Simple Elegance: Despite their gorgeous appearance, these mini red velvet cakes are surprisingly easy to make, allowing you to focus on enjoying the special moments with your loved ones.
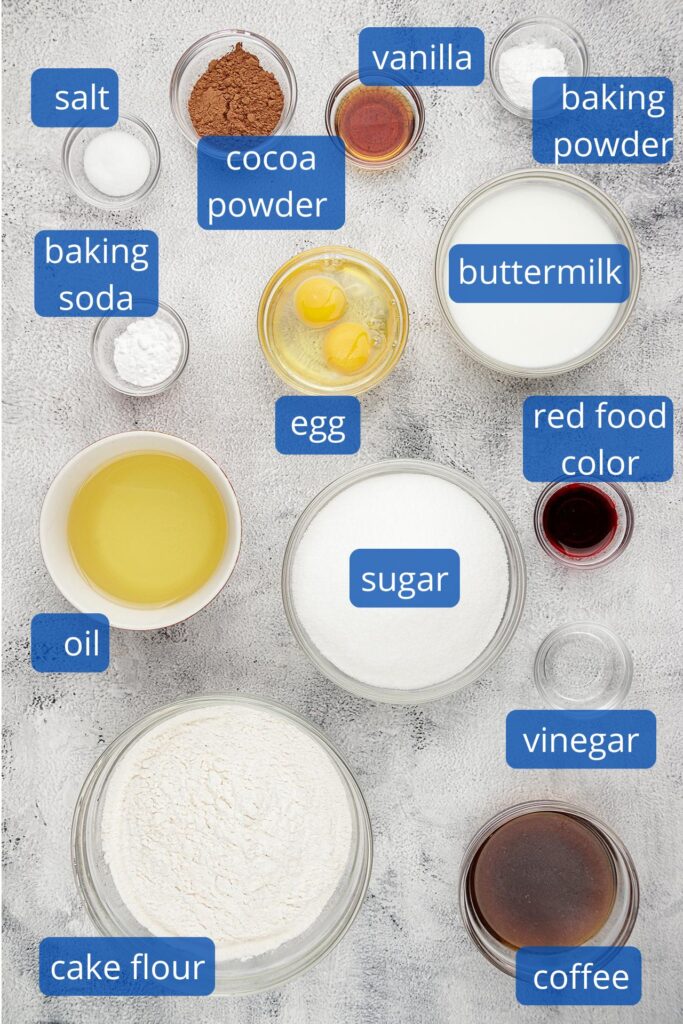
Ingredients
This small red velvet cake recipe is made with very simple ingredients which can be found in a local grocery store:
Mini red velvet cakes
- Cake flour ensures a fine, tender crumb texture, creating a delicate, soft cake. You can also use all-purpose flour, which will create a less tender but still delicious cake.
- Natural unsweetened cocoa powder adds a subtle chocolate undertone by balancing the sweetness. It also enhances the red color.
- Baking soda acts as a leavening agent and promotes a light and fluffy texture.
- Baking powder enhances rise and tenderness and works with the baking soda for optimal leavening.
- Salt elevates and balances sweetness by accentuating flavors and preventing too much sweetness.
- Vegetable oil ensures moist, tender crumb. by adding richness without overpowering flavor.
- Granulated white sugar sweetens the cake.
- Eggs add structure and moisture. Remember to use room temperature eggs so that all it incorporates seamlessly.
- Buttermilk enhances tenderness and flavor while providing acidity for a balanced rise.
- Hot coffee deepens the chocolate flavor and enhances the overall richness.
- Distilled white vinegar helps activate the baking soda. It also contributes to texture by reacting with baking soda, creating carbon dioxide gas which helps the cake rise and contributes to its light and fluffy texture.
- Vanilla extract infuses a delightful aroma.
- Liquid red food coloring helps achieve the iconic rich red color. You can also use red gel food coloring to get the beautiful red color.
Cream Cheese Frosting:

- Cream cheese helps deliver a rich, tangy flavor creating a luscious, creamy frosting base.
- Salted butter adds a smooth, velvety texture and balances the tanginess of cream cheese. If you use unsalted butter, add a pinch of salt to the frosting.
- Confectioner's sugar sweetens and thickens the frosting.
- Sour cream adds a subtle tang to the frosting and enhances the creaminess and smoothness of the frosting.
- Sprinkles are optional and used for decoration. If you do not have sprinkles, you can also you some moist crumbs to decorate the cakes.
Note: If you do not like cream cheese frosting, you can also decorate the cakes with mascarpone frosting, traditional ermine frosting and buttercream frosting.
How to make red velvet mini cakes
Step #1: Preheat and prep
- Preheat your oven to 350°F. For my heart shaped cupcakes, I am used a silicone mold which I did not grease because it was new. Note that silicone molds become less non-stick over time, so you might need to grease them lightly with a non-stick pan. If making regular cupcakes with a cupcake liner, place the liners in the muffin tin.
Step #2: Whisk dry ingredients
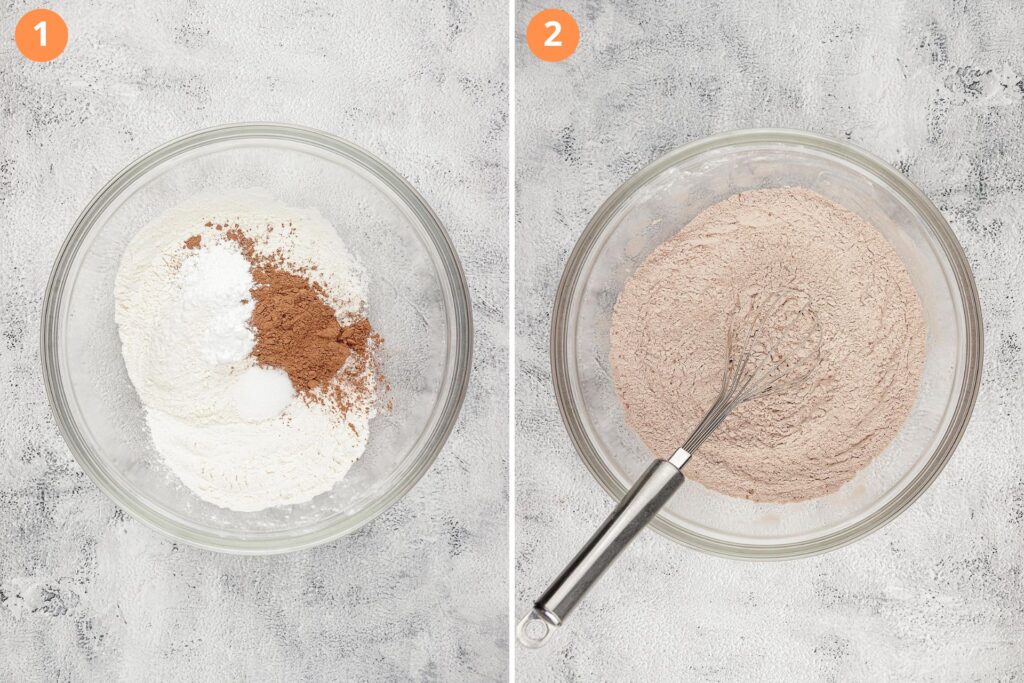
- Whisk together your dry ingredients - flour, cocoa powder, baking powder, baking soda, and salt. Set aside.
Step #3: Mix wet ingredients

- Add the oil, sugar, and eggs to the bowl of a stand mixer. Mix for 1-2 minutes on medium speed until light and fluffy. Add buttermilk, vanilla, vinegar, coffee, and red food color one at a time on low speed until fully incorporated. You can also use an electric mixer.
Step #4: Combine and bake

- Fold in the dry ingredients into the wet ingredients until just combined. Do not overmix to ensure that the cakes are as tender as possible. Pour the batter into the muffin tins, filling about ¾ of the way. Bake for 20 minutes or until a skewer inserted into the center comes out clean.
Step #5: Make the frosting
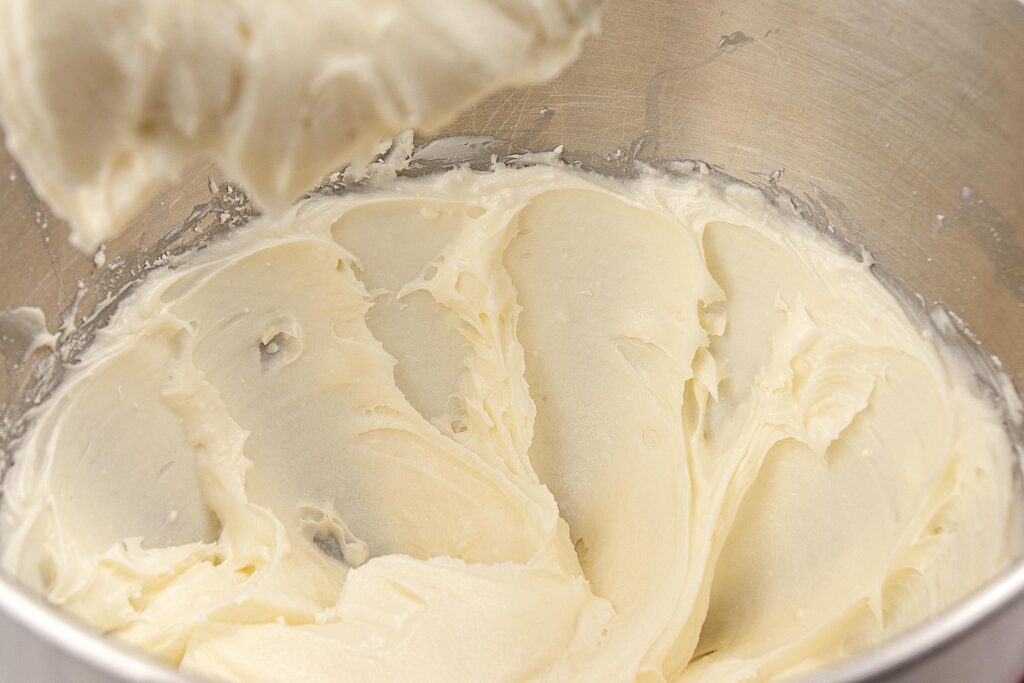
- While the cakes cool, prepare the Cream Cheese Frosting. Mix cream cheese, butter, sour cream, and vanilla until smooth. Gradually add powdered sugar in batches, beating between each batch, beating with the paddle attachment (not whisk!). The cream cheese frosting when all the powdered sugar is evenly incorporated and the frosting is stiff and holds its shape. Do not overmix as the batter will liquefy.
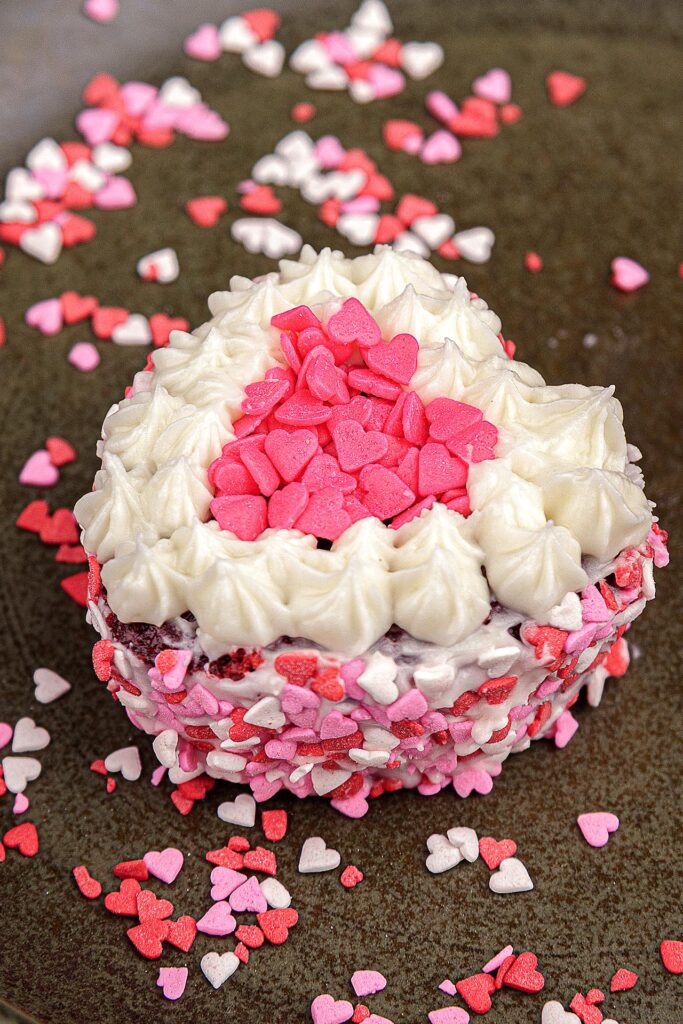
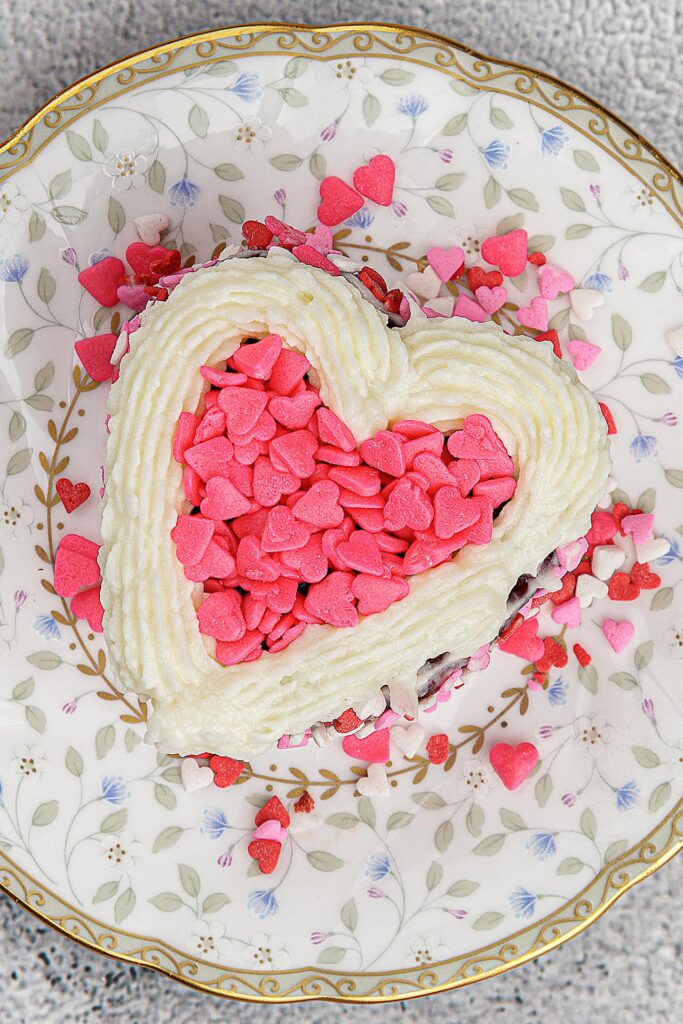
Step #6: Decorate the mini red velvet cakes

- Once the mini red velvet cakes are cool, frost with the cream cheese frosting and sprinkles. Lightly smear the sides of the mini cakes with the cream cheese frosting then press into a plate of mini heart shaped sprinkles in various shades of pink to cover the size. Outline the heart of the top of the cake with cream cheese. To pipe the frosting, place some cream cheese into a piping bag and use an open star tip to outline the heart. Feel free to get creative and decorate as you will with your favorite toppings.
Tips
- Use natural cocoa powder not Dutch processed cocoa. For the cake to have the proper rise and color, you need to use natural cocoa powder not Dutch processed powder. Hershey's natural unsweetened cocoa powder will work in this recipe but not Hershey's Special Dark 100% Cacao.
- Make the cupcakes the day before. The cupcakes are tastier the next day.
- Mix the wet and dry ingredients until just combined.
- All ingredients need to be room temperature. If any of the ingredients are too cold, it will result in a grainy batter changing the crumb structure and moistness of the baked cake.
Baking Tips for Perfect Mini Red Velvet Cakes
For a flawless batch of Gorgeous Mini Red Velvet Cakes, follow these essential baking tips to ensure the ideal rise, color, and flavor:
- Opt for natural cocoa powder. Achieve the proper rise and a vibrant red color by using natural cocoa powder. Hershey's natural unsweetened cocoa powder is recommended for this recipe, while Hershey's Special Dark 100% Cacao is not suitable.
- Prepare the cupcakes the day before. The cupcakes reach peak flavor and moisture the next day, providing a more delectable taste experience.
- Avoid overmixing. Gently mix the wet and dry ingredients until just combined. Avoid overmixing to preserve the perfect crumb texture of the cupcakes.
- All ingredients should be at room temperature. Cold ingredients can lead to a grainy batter, altering both the crumb structure and moistness of the baked cake. Allow all ingredients to reach room temperature for optimal results.
Nutrition
One serving of this mini red velvet cake recipe has about 207 calories, 1.7 grams of protein, 7.4 grams of fat, and 34.2 grams of carbohydrates.
This mini red velvet cake recipe yields approximately 36 servings. The nutritional information is intended as a general guideline. If the nutrition information is important to you, you should independently verify it using your preferred tool.
Storage and Leftovers
Refrigerator. Mini red velvet cakes can be stored in an airtight container for up to 4 days in the refrigerator. After that they may dry out.
Freezer. These mini red velvet cakes are best eaten fresh. However, you can freeze them is you like. Stored in an airtight container, these mini velvet cakes will last about 2 weeks in the freezer. When ready to eat, thaw overnight in the freezer.
Variations
- Classic Red Velvet Cake. Instead of making mini cakes, you can also make a full cake with this recipe. Simply pour the cake batter into a cake pan lined with parchment paper and bake until a skewer into the center comes out clean - about 40 minutes. This red velvet cupcake recipe also makes excellent layer cakes which you can fill with this or your favorite cream cheese frosting.
- Easy sheet cake. Pour the batter into a sheet pan then bake. Cover the top with frosting. For a festive touch, sprinkle some moist crumbs on top.
- Rich Chocolate Indulgence. Enhance the chocolate notes by incorporating dark cocoa powder into the batter. Elevate the experience with a luxurious ganache made from high-quality dark chocolate.
- Citrus Infusion Delight. Add a burst of citrusy flavor with the inclusion of fresh orange zest in the batter. Crown the mini cakes with a cream cheese frosting infused with the zesty notes of orange or lemon. Finish with candied citrus peels for a vibrant twist.
- Raspberry Elegance. Infuse a delightful berry twist by swirling raspberry jam into the batter. Top the cream cheese frosting with fresh raspberries and drizzle with melted white chocolate for an elegant touch.
- Mocha Bliss. Create a decadent mocha experience with the addition of espresso powder to the batter. Craft a coffee-infused cream cheese frosting and garnish with chocolate-covered coffee beans for an indulgent finish.
- Blueberry Citrus Symphony. Introduce berry flavors by incorporating a blueberry compote into the batter. Enhance the cream cheese frosting with a hint of lemon zest for a refreshing citrusy note.
FAQs
Elevate your red velvet cakes by using a round cookie cutter to create smaller-sized, personalized treats. Add a delightful touch by piping cream cheese buttercream using a pastry bag, and garnish with fresh fruit or chocolate chips for a visually appealing and tasty finish.

Mini Red Velvet Cupcakes with Cream Cheese Frosting
Ingredients
Dry Ingredients
- 2 ¼ cups cake flour 295 grams
- 2 Tablespoons natural unsweetened cocoa powder 14 grams
- 1 teaspoon baking soda 6 grams
- 1 teaspoon baking powder 6 grams
- 1 teaspoon salt 6 grams
Wet Ingredients
- 1 cup vegetable oil
- 1 ¾ cups granulated white sugar 350 grams
- 2 large eggs room temperature, separated
- 1 cup buttermilk room temperature
- ½ cup hot coffee
- 1 teaspoon distilled white vinegar
- 2 teaspoons vanilla extract
- 2 Tablespoons liquid food coloring as needed
Cream Cheese Frosting
- 8 ounces cream cheese softened, at room temperature
- ½ cup unsalted butter softened, at room temperature
- 2 cups confectioners sugar (one 16 ounce box)
- 2 Tablespoons sour cream
Sprinkles
- 2 ounces mini heart confetti sprinkles - shades of pink
- 2 ounces mini heart confetti sprinkles - red
Instructions
- Preheat and prep. Preheat your oven to 350°F. For my heart shaped cupcakes, I am used a silicone mold which I did not grease because it was new. Note that silicone molds become less non-stick over time, so you might need to grease them lightly with a non-stick pan. If making regular cupcakes with a cupcake liner, place the liners in the muffin tin.
- Whisk dry ingredients. Whisk together your dry ingredients - flour, cocoa powder, baking powder, baking soda, and salt. Set aside.
- Mix wet ingredients. Add the oil, sugar, and eggs to the bowl of a stand mixer. Mix for 1-2 minutes on medium speed until light and fluffy. Add buttermilk, vanilla, vinegar, coffee, and red food color one at a time on low speed until fully incorporated. You can also use an electric mixer.
- Combine and bake. Fold in the dry ingredients into the wet ingredients until just combined. Do not overmix to ensure that the cakes are as tender as possible. Pour the batter into the muffin tins, filling about ¾ of the way. Bake for 20 minutes or until a skewer inserted into the center comes out clean. Cool the cakes on a wire rack.
- Make the frosting. While the cakes cool, prepare the Cream Cheese Frosting. Mix cream cheese, butter, sour cream, and vanilla until smooth. Gradually add powdered sugar in batches, beating with the paddle attachment (not whisk!) between each batch. The cream cheese frosting when all the powdered sugar is evenly incorporated and the frosting is stiff and holds its shape. Do not overmix as the batter will liquefy.
- Decorate the mini red velvet cakes. Once the mini red velvet cakes are cool, frost with the cream cheese frosting and sprinkles. Lightly smear the sides of the mini cakes with the cream cheese frosting then press into a plate of mini heart shaped sprinkles in various shades of pink to cover the size. Outline the heart of the top of the cake with cream cheese. To pipe the frosting, place some cream cheese into a piping bag and use an open star tip to outline the heart. Feel free to get creative and decorate as you will with your favorite toppings.
Video
Notes
- Opt for natural cocoa powder. Achieve the proper rise and a vibrant red color by using natural cocoa powder. Hershey's natural unsweetened cocoa powder is recommended for this recipe, while Hershey's Special Dark 100% Cacao is not suitable.
- Prepare the cupcakes the day before. The cupcakes reach peak flavor and moisture the next day, providing a more delectable taste experience.
- Avoid overmixing. Gently mix the wet and dry ingredients until just combined. Avoid overmixing to preserve the perfect crumb texture of the cupcakes.
- All ingredients should be at room temperature. Cold ingredients can lead to a grainy batter, altering both the crumb structure and moistness of the baked cake. Allow all ingredients to reach room temperature for optimal results.
Nutrition
One serving of this mini red velvet cake recipe has about 207 calories, 1.7 grams of protein, 7.4 grams of fat, and 34.2 grams of carbohydrates. This mini red velvet cake recipe yields approximately 36 servings. The nutritional information is intended as a general guideline. If the nutrition information is important to you, you should independently verify it using your preferred tool.Storage and Leftovers
Refrigerator. Mini red velvet cakes can be stored in an airtight container for up to 4 days in the refrigerator. After that they may dry out. Freezer. These mini red velvet cakes are best eaten fresh. However, you can freeze them is you like. Stored in an airtight container, these mini velvet cakes will last about 2 weeks in the freezer. When ready to eat, thaw overnight in the freezer.
DID YOU MAKE THIS RECIPE?
We'd love to hear how it turned out. Please take a picture and tag us on Instagram @cloveandcumin!
Looking for more recipes?
Other Dessert Recipes


DID YOU MAKE THIS RECIPE?
We'd love to hear how it turned out. Please take a picture and tag us on Instagram @cloveandcumin!
Looking for more recipes?
Other Dessert Recipes
- Layered Chocolate Mousse Cake Recipe with Ganache25 Hours 40 Minutes
- Glazed Orange Scones - Panera Bread Copycat Recipe40 Minutes
- How To Make Mini Blueberry Pies | Simple & Easy50 Minutes
- Easy Mango Mousse Recipe With Just 3 Ingredients2 Hours 10 Minutes


Casey
I love red velvet cake and the cream cheese frosting complemented these mini desserts perfectly!
Lima
I am so glad you liked it!
Chenee
Mine weren't quite as beautiful as yours but they were certainly delicious! This recipe is perfect.
Lima
Aww thank you so much for the compliment! Thank you Chenee I am so glad you liked the recipe.
Gianne
The rich, moist cake paired with the tangy cream cheese frosting is a match made in heaven. The individual size is perfect for a little indulgence, and they are always a hit at parties!
Lima
So glad you liked the recipe Gianne!
Saif
This velvet cake looks delicious and gorgeous. Yummy!!
Lima
Thank you Saif!
Mahy
These are so tiny and just perfect for the coming holiday. Thanks a lot for the great idea!
Lima
Thank you for commenting Mahy!